
Blog

Wire Mesh Cabinet Doors: Stylish DIY and Custom Options

Wire Mesh Cabinet Doors: Stylish DIY and Custom Options

For most homeowners, ordering custom mesh-front doors from a specialist like Tdm-thedoormaker is the most reliable route to wire mesh cabinet doors that fit correctly and stay looking sharp for years. If you’re comfortable measuring twice and cutting once, buying a mesh panel and fitting it into your existing door frame yourself is a legitimate second option.

  • Custom mesh-front doors: exact sizing, finish matched to your kitchen, no cutting or sharp edges to manage yourself.
  • DIY mesh insert: lower upfront cost, but you handle measuring, cutting, and edge finishing.

The tradeoff comes down to time and risk tolerance. Custom doors cost more per unit but arrive ready to hang, with a known lead time and a finish you’ve already approved. DIY panels save money if your cabinet openings are simple rectangles, but a single mis-measured cut means reordering material and losing a weekend.

Pro Tip: Order a small sample panel before committing either way. A 4-inch swatch tells you more about how a finish reads in your kitchen’s light than any product photo ever will.

Key Takeaways

Custom mesh-front doors from a specialist deliver the most reliable fit and finish, while DIY mesh panels work well for simple, budget-conscious single-door projects.

Point Details
Pick the right route Custom doors suit complex or full-kitchen projects; DIY suits simple rectangular openings.
Match mesh to function Tighter weaves conceal contents; open grilles display items and improve airflow.
Order samples first A 4-inch swatch confirms finish and opacity before you commit to a full panel.
Use a rubber retainer This attachment method gives a cleaner edge than staples and cuts installation time.
Consider Tdm-thedoormaker Its configurator and sample program deliver precise sizing without DIY measuring risk.

Table of Contents

Why Choose Wire Mesh Panels for Cabinet Doors?

Wire mesh solves a problem that solid wood and glass can’t: it lets air move while still giving your cabinet a finished, intentional look. That matters more than most homeowners expect until they’ve dealt with a musty wine cabinet or an overheating media console.

  • Ventilation — reduces heat buildup around electronics and prevents moisture from getting trapped in wine or linen storage.
  • Durability — metal resists the dents and cracks that plague glass panels near a busy kitchen.
  • Visual control — tighter weaves conceal clutter; open grilles put a nice dish collection on display.
  • Texture contrast — breaks up a wall of flat cabinet fronts without a full remodel.

Media consoles benefit from mesh because it hides cables and speakers while letting sound and heat escape. Wine cabinets use it to maintain airflow around bottles. Pantry doors with a tighter weave keep contents out of view while still venting the space. Manufacturers report that metal mesh panels often outlast glass or solid wood inserts, largely because metal simply tolerates daily wear better than either alternative.

Mesh Types, Patterns, and Finishes: How Do You Pick?

Match the pattern to the job first, then worry about finish. Woven wire mesh creates a finer weave that gives semi-transparent coverage, good for cabinets where you want a hint of what’s inside without full visibility. Wire grille or crimped patterns use larger apertures and read more like a decorative screen than a barrier, better suited to hutches or display cabinets where you want contents on show.

Material choice shapes both looks and longevity:

  • 304 stainless steel — the standard choice for kitchens; resists moisture and everyday wear.
  • 316 stainless steel — a step up for humid environments like bathrooms or exterior cabinetry.
  • Brass and copper — warm tones that pair well with traditional or farmhouse kitchens; both develop a patina over time unless sealed.
  • Aluminum — lightweight and budget-friendly, though softer than steel.
  • Galvanized steel — utilitarian, often used in rustic or industrial designs.

Finish options like antique brass, powder coat, and PVD titanium coatings change the tone dramatically. Designers advise choosing mesh density based on function: tighter weaves for concealment, open grilles for display and airflow. Wire diameter and aperture size work together. A thicker wire with a small opening feels solid and private; a thin wire with a wide aperture feels light and airy but shows more of what’s behind it.

Pro Tip: Hold a sample swatch against your cabinet hardware before ordering. Brass mesh next to brushed nickel pulls almost always looks like a mismatch in person, even when it looked fine in a catalog photo.

How Do You Fit Wire Mesh Into Cabinet Doors?

The simplest secure method for most DIYers is cutting a rigid panel to size and holding it in place with a rubber retainer set into a recessed groove in the door frame. It’s cleaner than staples and faster than building a full mullion frame around the mesh.

  1. Remove the door and measure the inner opening precisely, then build a cardboard template to confirm the fit before touching the actual mesh.
  2. Cut the panel using aviation shears or tin snips, sizing slightly smaller than the opening to leave room for the retainer.
  3. Fit a rubber retainer or spline around the edge to cover sharp wire ends and seat the panel cleanly.
  4. Secure the panel using the retainer groove, or with small screws through a trim strip if your frame doesn’t have a recess.
  5. Rehang the door and check hinge alignment, since mesh panels weigh less than the wood or glass they replace and can shift how the door hangs.

Tools and supplies: aviation shears, a small drill with countersink bit, clamps, protective gloves, rubber retainer or gasket material, and a straightedge for measuring.

Pro Tip: Rubber retainers or splines produce a noticeably cleaner backside than staples or glue, and they cut installation time roughly in half.

Hands securing rubber retainer on wire mesh cabinet door

Hire a professional for shaped stiles, curved mullions, or any door where the mesh needs to follow an irregular edge, consulting with Interior Closet Doors | One Day Doors & Closets specialists to ensure proper fitting and local installation. Cut metal edges are sharp enough to draw blood, so gloves aren’t optional, and always double check your hinge and hardware fit before final assembly.

How Do You Measure Cabinet Doors for Wire Mesh?

Measure the inside of the door frame, not the outer door dimensions, and order or cut your panel to that inner opening minus a small allowance for the retainer or reveal.

  • Measure width and height at three points each (top, middle, bottom) since older cabinet frames are rarely perfectly square.
  • Note whether your doors use an inset or overlay style, since that changes how much reveal you need to plan for.
  • Record any mullion or lite openings separately if your door has multiple mesh panels rather than one large piece.
  • Photograph the frame and hinge hardware for reference when ordering.

A cardboard template remains the single best way to catch measurement errors before they become expensive mistakes, particularly on doors with shaped rails. If you’re ordering from The Door Maker’s configurator, you’ll enter these same inner dimensions directly rather than cutting anything yourself.

Pro Tip: Always order a 4-inch sample before a full panel order. It’s the cheapest insurance against discovering the finish or aperture looks wrong once it’s already installed.

Where Can You Buy Mesh Panels or Finished Mesh-Front Doors?

Tdm-thedoormaker offers finished mesh-front doors sized to your exact specifications through its online configurator, with sample doors and finish swatches available before you commit to a full order. That route removes the cutting and edge-finishing steps entirely.

If you’d rather source mesh yourself, architectural mesh suppliers and woodworking catalogs sell cut-to-size panels or full sheets in standard gauges, and most offer sample kits so you can check finish and opacity in your own lighting before buying in bulk. Compare stock availability against custom lead times, and confirm the supplier’s return or sample policy before placing a large order.

  • Request a wire diameter and aperture spec sheet from any supplier before ordering.
  • Order a small sample panel and view it under your kitchen’s actual lighting.
  • Confirm whether panels ship cut-to-size or require trimming on your end.

Which Mesh Specs Actually Matter?

Three numbers decide whether a mesh panel will work for your cabinet: wire diameter, aperture size, and open-area percentage. Wire diameter determines strength and how rigid the panel feels once installed. Aperture size (the opening between wires) controls how much you can see through the mesh and how much air passes through it. Open-area percentage combines both into a single figure suppliers use to compare products.

Decorative wire mesh specifications typically list all three alongside material grade, so ask any supplier for that same data before ordering. A tighter aperture with a thicker wire gives you privacy and strength, useful for a pantry door. A wider aperture with a thinner wire maximizes visibility and airflow, better for a display hutch. Always confirm whether a panel is 304 or 316 stainless, since the difference matters most in humid rooms.

  • Ask for wire diameter in inches or millimeters, not just a general “gauge” description.
  • Request the open-area percentage to compare products apples to apples.
  • Confirm material grade in writing if corrosion resistance matters for your space.

How Do You Maintain Wire Mesh Cabinet Doors?

Routine care is simple: dust regularly, wipe with a non-ammonia cleaner, and polish plated finishes occasionally to keep them bright.

  • Stainless steel: wipe with a soft cloth and mild soap; avoid steel wool.
  • Brass or copper: polish periodically to slow natural patina if you want a bright finish.
  • Powder coat: clean with a damp cloth; skip abrasive pads that can scratch the coating.

Avoid ammonia-based or acidic cleaners on any finish, since they can dull or discolor metal over time. Most finishes need only a wipe-down every few weeks, with occasional polishing for brass or copper accents.

What Do Wire Mesh Cabinet Doors Cost?

Custom mesh-front doors from a specialty provider typically run higher per door than raw DIY mesh material, but that price includes precise sizing, a finished edge, and a warranty on workmanship you won’t get cutting your own panel. The exact per-door price depends on your material choice, finish, and door dimensions, so getting a quote through an online configurator is the fastest way to see real numbers for your kitchen.

DIY material costs less upfront since you’re only paying for raw mesh sheet or a cut-to-size panel, plus retainer material and basic tools if you don’t already own them. But that lower sticker price doesn’t include your time, the cost of a miscut panel if measurements go wrong, or the tools you may need to buy for a one-time project. Aviation shears, a countersink bit, and retainer material add up quickly if you’re starting from zero.

Stainless steel mesh generally costs more than aluminum or galvanized options, and premium finishes like antique brass or PVD titanium coatings carry a price premium over standard powder coat. Larger apertures with thinner wire tend to cost less per square foot than dense weaves with thick wire, since less material goes into the panel.

The real cost comparison isn’t material versus material. It’s finished product versus your own labor, tool investment, and risk of a bad cut. For a single cabinet door, DIY often wins on price. For a full kitchen’s worth of matching doors, the labor and consistency argument tips toward ordering custom.
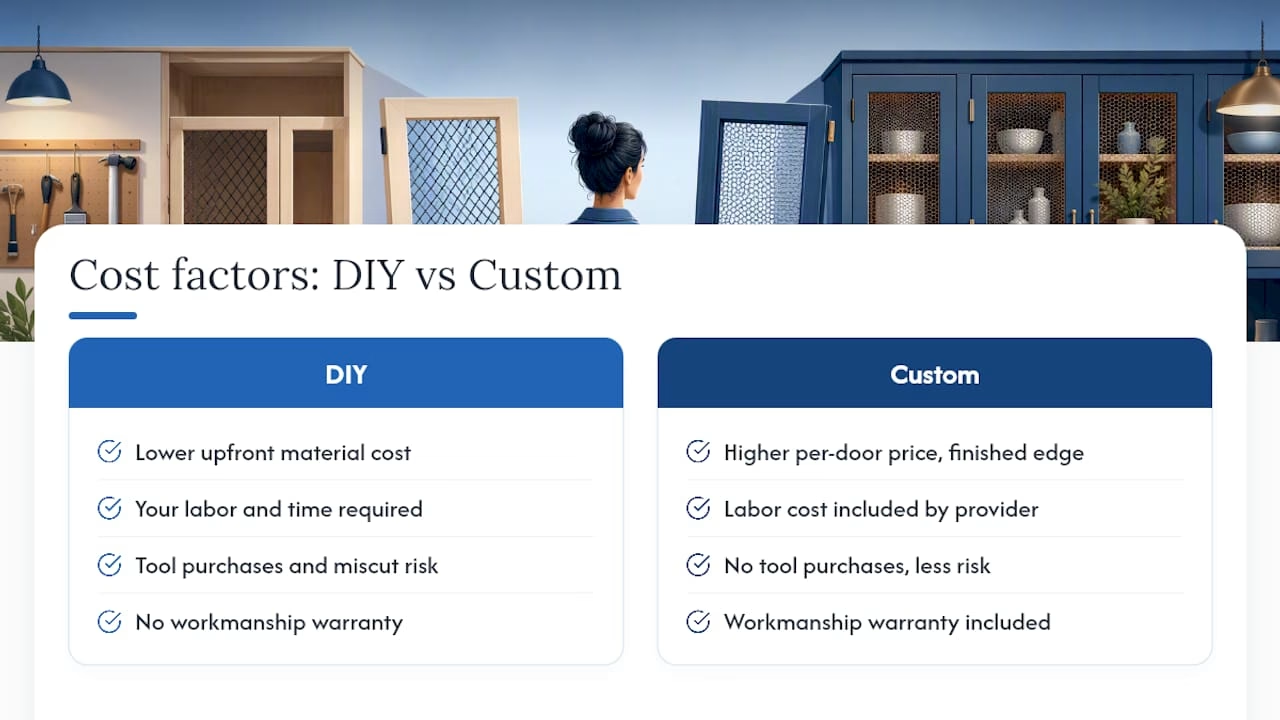
Cost comparison between DIY and custom wire mesh cabinet doors

How Long Does the Whole Project Take?

Measuring a single cabinet opening takes about 15 to 20 minutes if you’re careful and build a template first. A full kitchen with a dozen doors can take two to three hours of measuring alone, especially if your cabinets are older and not perfectly square.

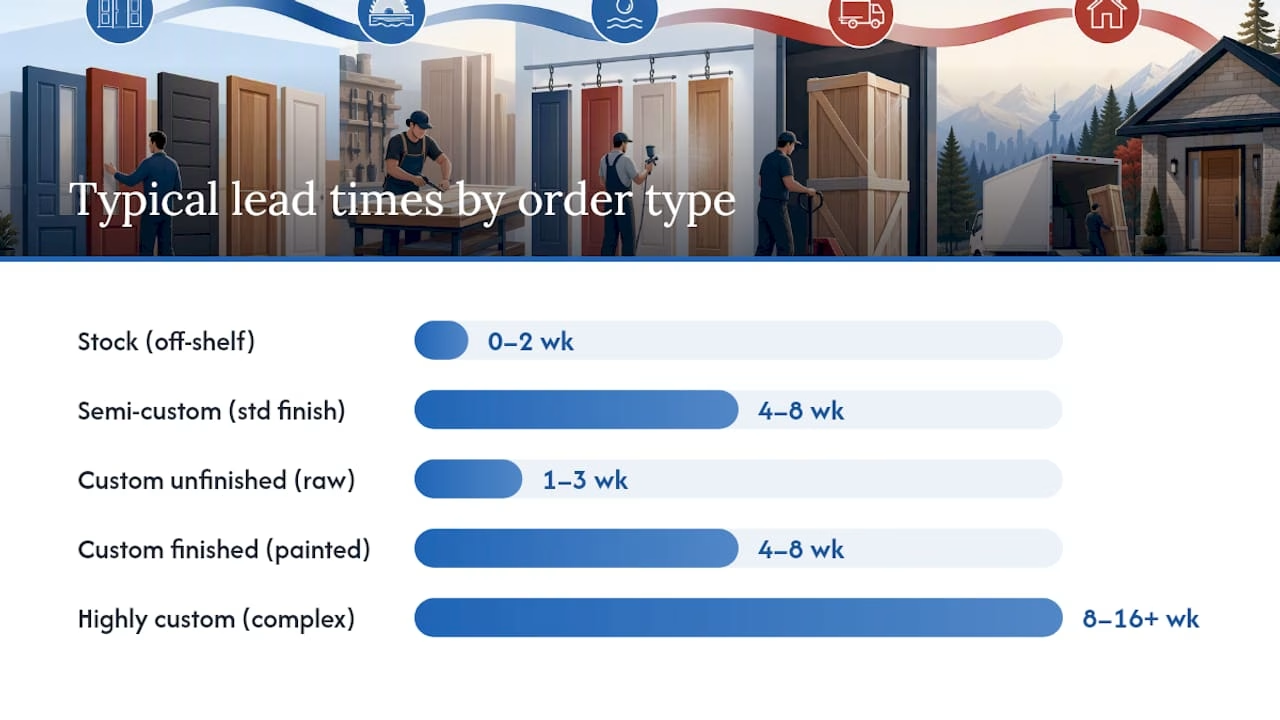
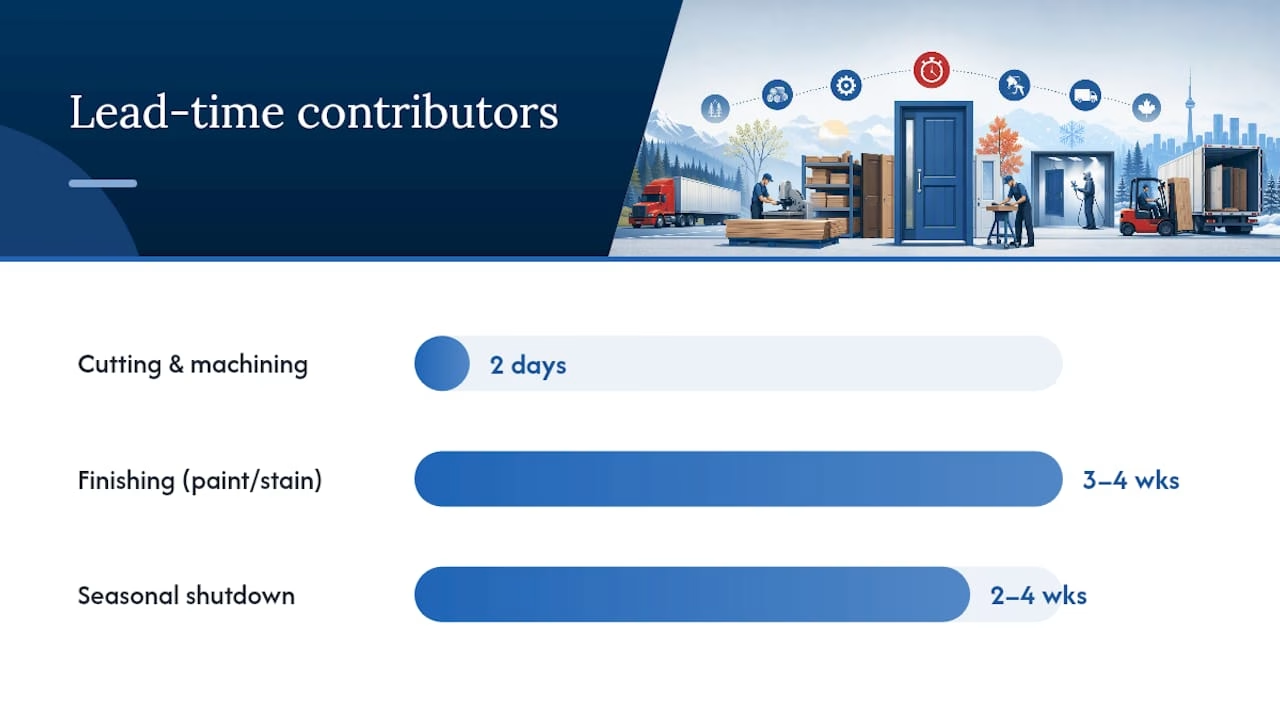
Sourcing materials is where timelines diverge sharply. Ordering a custom mesh-front door typically means a defined lead time from the supplier, often measured in weeks rather than days, since each door is cut and finished to your specifications. DIY material sourcing can be faster if a local supplier stocks standard sheet sizes, but if you need a specific finish or gauge, expect to wait on a special order just the same.

Installation time depends entirely on door count and complexity. A single flat-panel door with a rubber retainer might take 30 to 45 minutes once the mesh is cut and the template has confirmed the fit. A full kitchen with a dozen doors, plus hinge checks and hardware reinstallation, can realistically eat up a full weekend for a competent DIYer working alone.

Budget extra time for the sample-ordering step too. Waiting on a swatch before committing to a full order adds days to your timeline, but it’s time well spent compared to redoing an entire project because the finish looked different once installed.

What Goes Wrong During Installation?

The most common pitfall is measuring the outer door dimensions instead of the inner frame opening, which leads to a panel that’s too large to fit without forcing it. Always measure the inside of the frame where the mesh actually sits, not the door’s overall size.
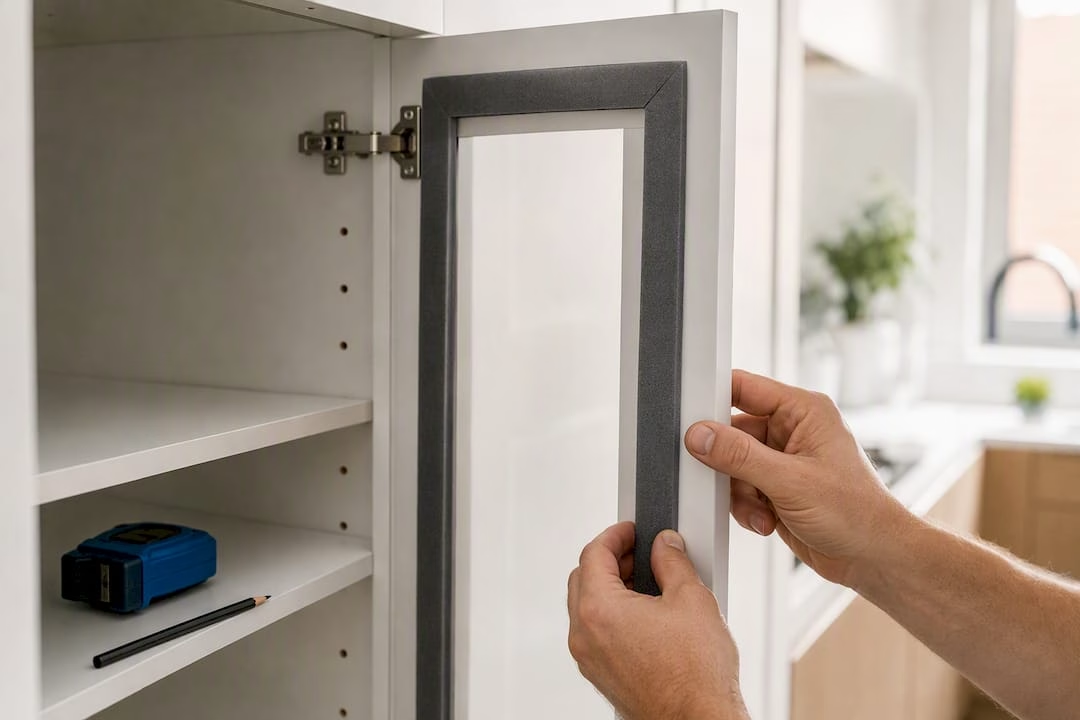
Using cardboard template to measure cabinet door frame interior

Failing to account for reveal or rebate depth is a close second. If you cut a mesh panel to fit flush against the frame with no allowance, it may bind against the retainer or refuse to seat cleanly. A cardboard template catches this before you’ve wasted material.

Sharp wire edges cause more frustration than most people expect. Skipping a rubber retainer or edge trim leaves exposed wire ends that can snag towels, clothing, or fingers every time the cabinet is opened. It’s a small step that makes a real difference in daily use.

Hinges are another overlooked detail. Mesh panels weigh less than the wood or glass they replace, which can shift how a door hangs, especially on larger doors. Always rehang and check alignment after installation rather than assuming the original hinge setting still applies.

For doors with shaped stiles or curved rails, measure and cut only after the actual door is in hand rather than working from written dimensions, since small variations in shape are easy to miss on paper. If a panel doesn’t sit flush, the culprit is almost always a missed reveal allowance or a template that didn’t account for hinge hardware.

Should You DIY or Order Custom Mesh Doors?

Choose DIY if your cabinet openings are simple rectangles and you’re comfortable with hand tools. Choose custom mesh-front doors if your cabinets have shaped stiles, you want a guaranteed finish match, or your time is worth more than the labor savings.

  • Door complexity — simple rectangles favor DIY; curved or mullioned frames favor custom.
  • Finish expectations — an exact match across a whole kitchen favors ordering custom doors.
  • Time versus cost — a single door favors DIY savings; a full kitchen favors custom consistency.

Pro Tip: Order one custom door as a test before committing to a full kitchen. It tells you exactly what to expect on finish, fit, and turnaround.

How Tdm-thedoormaker Makes Wire Mesh Cabinet Doors Simple

Tdm-thedoormaker removes the guesswork of measuring, cutting, and matching finishes that trips up so many DIY mesh projects. You get precise sizing to a level no hand-cut panel can match, along with a finish selection that’s already been tested for wear.

Tdm-thedoormaker

The online configurator walks you through measuring, choosing a finish, and placing an order in three steps, with video tutorials if you get stuck at any point. If you’re not sure which finish suits your kitchen, sample doors and color swatches let you check the look and texture in your own lighting before you commit to a full set. Precise sizing down to 1/10,000 inch means the door you receive fits the opening you measured, no template guesswork required. Start by ordering a sample or entering your measurements into the configurator to see real pricing for your project.

Frequently Asked Questions

Can I install wire mesh in my existing cabinet doors without replacing them?
Yes, if your door frame has a routed groove or you’re willing to add a trim strip. Remove the existing panel, measure the inner opening, and fit a cut-to-size mesh panel using a rubber retainer or screws.

What’s the difference between chicken wire and decorative wire mesh for cabinets?
Chicken wire is a hexagonal woven wire meant for fencing, not cabinetry. Decorative wire mesh cabinet doors use purpose-built woven or welded patterns with consistent apertures, proper wire diameter, and finishes designed to hold up indoors.

Does wire mesh work for pantry doors, or is it better for display cabinets?
Both, depending on the weave. A tighter woven mesh conceals pantry contents while still venting the space, and a more open grille pattern suits display hutches where you want items visible.

How much does a custom wire mesh cabinet door typically cost compared to DIY?
Custom doors cost more per unit but include precise sizing and finished edges. DIY panels cost less in raw material but add your own labor, tools, and the risk of a miscut panel.

Where can I buy wire mesh cabinet door panels or finished doors?
Tdm-thedoormaker offers finished custom mesh-front doors through its online configurator. Architectural mesh suppliers and woodworking catalogs sell raw cut-to-size panels for DIY projects.

Sources

Compare wire diameter and aperture across supplier pages before requesting samples.
FROM THE SAME CATEGORY

Sep 8 2026 BY Ksenija Lebec, Blog

Landlords: inspect cabinets, run vacancy based ROI, budget $1,000–$13,000, and plan 1–3 day refacing installs with bulk order tips.

Build a Door MADE TO FIT YOU!

Hinge Drilling Patterns: Measurements and Jigs That Work

Hinge Drilling Patterns: Measurements and Jigs That Work

For concealed (Euro) hinges, drill a 35 mm cup at the specified setback (commonly 3 mm or 5 mm) and follow your hinge’s drilling-pattern schematic, then use a jig to hit depth and spacing precisely. That single sentence solves most of what sends people searching for hinge measurements at 9 p.m. the night before installation.

Here’s what you need before you pick up a drill:

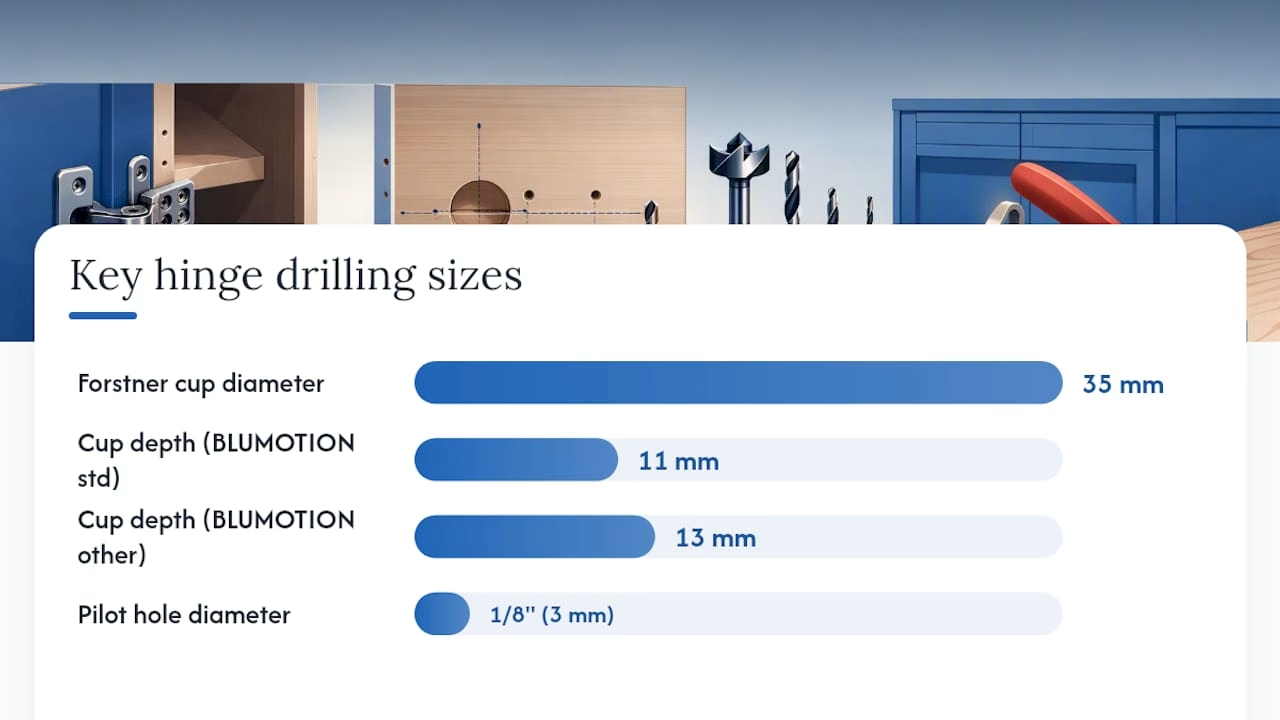
  • Cup diameter: 35 mm on virtually every concealed hinge you’ll encounter.
  • Cup depth typically varies within a certain range depending on the hinge series and soft-close mechanism.
  • Setback (edge of door to cup center) is commonly one of two typical distances, depending on hinge type and overlay.
  • Secondary holes vary in size depending on style, typically larger for dowel or press-fit types and smaller for screw-mounted pilot holes.

The single biggest mistake DIYers make isn’t drilling too shallow or too deep. It’s assuming one hinge’s spec applies to another hinge that looks identical.

Pro Tip: Before you touch a drill, pull up the exact spec sheet for the hinge in your hand. A 2 mm difference in cup depth is enough to make a door bind or sit proud of the cabinet frame.

If you’d rather skip the measuring altogether, Tdm-thedoormaker offers hinge hole drilling as an add-on when you order custom doors, which is worth knowing before you commit to a Forstner bit and a Saturday afternoon.

Key Takeaways

Accurate hinge drilling depends on matching the Ø35 mm cup diameter, correct depth, and setback to your specific hinge’s schematic before drilling anything.

Point Details
Standard cup size Nearly all concealed hinges use a Ø35 mm cup, but depth (11 to 13 mm) varies by model.
Setback drives fit Overlay and mounting plate height determine whether your setback should be 3 mm or 5 mm.
Jigs beat freehand Manufacturer templates or universal jigs deliver the repeatable accuracy freehand drilling cannot.
Small errors are fixable Dowel plugs, adjustment cams, and re-boring solve most misalignment without replacing the door.
Skip the risk entirely Tdm-thedoormaker’s hinge hole add-on delivers doors pre-drilled to your exact pattern and setback.

Table of Contents

What Are the Different Hinge Drilling Patterns?

Concealed hinge manufacturers group their hardware into pattern families, generally labeled A through F. Every pattern in that lineup shares one constant: the Ø35 mm cup. What changes is everything else that surrounds it.

  1. Patterns A and B typically use simple two-hole or four-hole screw mounting with 3 to 5 mm pilot holes and shallower cup depths.
  2. Patterns C and D often introduce 8 mm dowel or press-fit holes for tool-free plate attachment, common on factory-built cabinetry.
  3. Patterns E and F frequently pair deeper cups (up to 13 mm) with wider hole spacing to accommodate heavier soft-close mechanisms.

The variable elements that actually determine whether a hinge fits your existing holes are cup depth, the number and size of secondary holes, and the center-to-center spacing between them. A hinge pattern guide from Hettich shows that pattern families differ in secondary-hole placement and installation method, and that some patterns can be adapted to others only by filling existing holes or re-boring to a new depth.

A quick number worth remembering: Ø35 mm. That single measurement covers the vast majority of concealed hinges sold today. Everything else on the schematic is what separates one manufacturer’s system from another’s, which is exactly why swapping hinge brands mid-project without checking the pattern first causes more headaches than any other step in cabinet refacing.

Which Bits and Jigs Do You Actually Need?

You need surprisingly few tools, but the right ones matter more here than almost anywhere else in cabinetry.

  • A Ø35 mm Forstner bit or dedicated hinge-boring bit, ideally with a built-in depth stop set to 11 to 13 mm.
  • A 1/8″ (3 mm) pilot bit for screw holes, and an 8 mm bit if your pattern calls for dowel or press-fit holes.
  • One of three jig types: a manufacturer template matched to your exact hinge series, a universal concealed-hinge jig for mixed hardware, or a router-based template for high-volume runs.
  • A cordless drill with an adjustable clutch, or a drill press if you’re doing more than a handful of doors.

Freehand boring simply cannot deliver the repeat accuracy this job demands. Kreg’s routing jig and similar products exist because consistent depth and setback across multiple doors are nearly impossible to hold by eye.

Pro Tip: Clamp a sacrificial backer board underneath the door before boring. It stops blowout on the back face, which is the single most common rookie mistake with a Ø35 mm bit.

Hands clamping backer board under cabinet door

How Do You Measure Setback and Hinge Spacing?

Measuring comes down to four numbers: overlay, setback, vertical cup placement, and how many hinges the door needs.

  1. Determine your overlay (how far the door covers the cabinet face frame or box side).
  2. Calculate setback by subtracting the mounting plate’s projection from your target overlay. Full overlay doors commonly land at 3 mm; inset or partial overlay doors often need 5 mm.
  3. Mark vertical cup centers at roughly 3 inches (75 mm) from the top and bottom edges of the door.
  4. Add a third hinge on any door taller than 36 to 40 inches to prevent sagging.

A worked example: if your mounting plate has a 0 mm plate height and you want a standard full overlay, a 3 mm setback usually centers the door correctly on the frame. Change the mounting plate and that number shifts, since overlay and mounting-plate height directly determine your final setback.

  • Overlay type changes your target setback.
  • Mounting plate height changes how far the hinge arm sits from the cup.
  • Door height above 36 to 40 inches means a third hinge, non-negotiable for structural support.

Pro Tip: Drill your first cup in a scrap piece the same thickness as your door before committing to the real thing. It costs you two minutes and saves you a $60 mistake if your overlay math is off.

What Is the Step-by-Step Drilling Process?

Once your measurements are marked, the actual drilling sequence is short and repeatable.

  1. Confirm the hinge’s technical spec sheet one more time. Cup depth and hole diameter should match exactly.
  2. Select your Ø35 mm bit and set the depth stop according to your hinge’s spec sheet; common depths include certain standard values for CLIP top style hinges, with some variants requiring a deeper cut.
  3. Clamp the door securely to your bench or drill press table.
  4. Mark the cup center with a square and a center punch to prevent bit walk.
  5. Bore the cup at a steady, moderate feed rate, lifting periodically to clear debris and avoid heat buildup.
  6. Pre-drill screw holes at the recommended pilot diameter, usually 1/8″ (3 mm), at the depth specified on the schematic.
  7. Insert the hinge cup and test-fit before driving any screws home.

According to Blum’s assembly documentation, an 11 mm cup depth is standard for many CLIP top BLUMOTION variants, though the same manufacturer specifies 13 mm for other hinge configurations in that same product line. That one detail explains why two hinges that look nearly identical on a shelf can require completely different drill settings.

Run your drill at a moderate speed rather than full throttle. A high RPM generates heat that scorches MDF edges and can melt melamine coating around the cup. Wear eye protection and a dust mask, since a 35 mm Forstner bit throws a surprising amount of debris even in a well-ventilated shop.

Diagram of the hinge drilling step-by-step process

Should You Use a Manufacturer Template or a Universal Jig?

The right jig depends on volume and how much your hardware varies from door to door.

  • Manufacturer templates (like Blum’s boring templates and assembly aids) give you exact-fit accuracy when you’re staying within one hinge series.
  • Universal concealed-hinge jigs flex across brands and are the practical choice if your project mixes hardware from different suppliers.
  • Router-based templates, such as those built for high-volume shops, suit anyone drilling dozens of doors or working with square-corner hinge styles.
  • Retail options like a drilling template for Euro hinges give hobbyists an affordable middle ground between a full manufacturer kit and freehand marking.

Look for positive placement pins and adjustable setback on any jig you buy. If you’re drilling more than a few doors, or working with hardware you’ve never touched before, ordering pre-drilled doors removes the guesswork entirely.

How Do You Fix a Misdrilled Hinge Hole?

Small errors are usually fixable without replacing the door.

  • Oversize or off-center cups: glue in a dowel plug, let it cure, sand flush, and re-bore at the correct location.
  • Binding or gaps after hanging: most hinges have side, height, and depth adjustment cams that move the door a few millimeters in each direction without redrilling anything.
  • Converting press-fit to screw-on: fill the old holes, let them cure fully, then pre-drill fresh pilot holes at the correct diameter.
  • Material matters: solid wood takes a plug and glue well, MDF needs a slightly different filler to avoid crumbling at the edge, and coated panels like melamine or thermofoil require careful color matching if the repair will show.

Pro Tip: Try the adjustment cams before you reach for a drill. Most fit issues that look like a bad hole are actually a hinge that just needs a quarter turn on its depth screw.

Is It Better to Drill Hinges Yourself or Order Pre-Drilled Doors?

DIY drilling makes sense for small jobs where you already own a jig and trust your measurements. Large batches, unusual patterns, or delicate veneers tip the scale toward ordering pre-drilled doors instead. A cabinet maker weighing an afternoon of setup time against the risk of one ruined door usually finds the math favors precision over speed.

Order Pre-Drilled Doors and Skip the Guesswork

Tdm-thedoormaker builds hinge holes directly into your custom doors, so the Ø35 mm cup, setback, and secondary holes are cut to spec before the door ever reaches your kitchen. That means no scrap-wood test drilling, no ruined melamine panel from a bit that walked off center, and no afternoon lost to a jig that didn’t fit your hinge brand.

Tdm-thedoormaker

The holes for hinges add-on works through the same online configurator you’d use for the doors themselves. You’ll just need your hinge type, drilling pattern, setback, and overlay on hand when you order, the same numbers this guide walked you through. If you’re still deciding whether refacing or full replacement makes more sense for your project, the refacing versus replacement comparison breaks down the cost and time trade-offs. And if you’d rather compare the full DIY route against a done-for-you finish, the guide on DIY cabinet refacing that looks custom is a useful next stop. For a broader sense of what a project like this costs beyond hardware, Sigma Painting’s cabinet painting cost guide is a solid outside reference. When you’re ready, start your order with pre-drilled hinge holes already specified.

Where to Verify Your Exact Hinge Specs

Always confirm numbers against the source before drilling:

  • Blum’s CLIP top BLUMOTION assembly documentation for cup depth and setback specs.
  • Hettich’s hinge and plate guide for pattern family differences.
  • Print your hinge’s schematic and follow its cup depth and secondary-hole instructions exactly, since substituting a similar-looking hinge’s numbers is the most common cause of a bad fit.

Frequently Asked Questions

What is the standard hinge drilling pattern for cabinet doors?
Most concealed hinges use a Ø35 mm cup with a setback of 3 mm or 5 mm and a cup depth between 11 and 13 mm, though you should always confirm against your specific hinge’s spec sheet.

How deep should I drill a Euro hinge cup?
Depth typically runs 11 to 13 mm depending on the hinge series. CLIP top BLUMOTION hinges commonly specify 11 mm for some variants and 13 mm for others.

Can I use one hinge brand’s drilling pattern for a different brand?
Sometimes, but only with adaptation. Secondary hole spacing and cup depth often differ enough that you’ll need to fill old holes or re-bore to a new depth rather than swap hardware directly.

What size drill bit do I need for hinge holes?
A Ø35 mm Forstner or hinge-boring bit for the cup, plus a 1/8″ (3 mm) pilot bit for screw holes and an 8 mm bit if your pattern uses dowel or press-fit mounting.

Is it better to order pre-drilled cabinet doors instead of drilling myself?
For large batches, uncommon patterns, or delicate finishes like veneer or melamine, ordering pre-drilled doors reduces the risk of a costly mistake compared to freehand or first-time drilling.

Sources

FROM THE SAME CATEGORY

Sep 8 2026 BY Ksenija Lebec, Blog

Landlords: inspect cabinets, run vacancy based ROI, budget $1,000–$13,000, and plan 1–3 day refacing installs with bulk order tips.

Build a Door MADE TO FIT YOU!

Partial Overlay Cabinets: What Homeowners Need to Know

Partial Overlay Cabinets: What Homeowners Need to Know

Partial overlay cabinets are doors and drawer fronts that cover most, but not all, of the cabinet’s face frame, leaving a consistent visible strip of wood, usually about half an inch, around each opening. That half-inch reveal is the detail installers and cabinetmakers use to identify the style on sight, and it’s the most common partial-overlay measurement across American kitchens built before the 2000s.

Here’s the quick verdict: if you’re refacing an older home, working with a tighter budget, or want the traditional, layered look of a classic kitchen, partial overlay is usually the right call. It sits between full overlay (nearly no visible frame, a tighter, more modern look) and inset (doors sit flush inside the frame, the most expensive and exacting option). Partial overlay splits the difference on cost, style, and forgiveness during installation.

You’ll likely want partial overlay if:

  • Your budget needs to stretch further than full overlay allows, since full overlay doors can run about 16% more due to larger door sizes and material use.
  • You’re going for a traditional, farmhouse, or classic kitchen aesthetic where visible face frame is part of the design language.
  • You’re retrofitting an older house with walls or cabinet boxes that aren’t perfectly square, since the larger reveal hides minor misalignment far better than a tight full-overlay fit.

Table of Contents

What Is a Partial Overlay Cabinet, and How Does It Compare?

The word “overlay” describes how far a door or drawer front extends over the cabinet’s face frame, the wood border around each opening on framed cabinet boxes. Partial overlay covers most of that frame but leaves a visible band around it, while full overlay covers nearly all of it, shrinking the reveal down to about a quarter inch. Inset cabinets go the other direction entirely: the door sits inside the frame opening, flush with the front edge, so the entire frame stays visible.

These aren’t just cosmetic differences. Each style changes how the cabinet opens, how much labor goes into building the box, and how much room you have for error when you measure.

Feature Partial Overlay Full Overlay Inset
Appearance Visible frame strip, roughly 1/2" to 1" Minimal frame, roughly 1/4" reveal Entire frame visible, door flush with face
Opening accessibility Standard, unobstructed Slightly larger door swings possible Can restrict opening if hinges are exposed
Structural support Face frame adds rigidity Face frame still present, less visible Face frame doubles as the door stop
Cost and material use Lower, smaller doors Higher, larger doors and boxes Highest, precision joinery required
Hinge visibility Semi-concealed hinges common, often visible Concealed cup hinges, hidden Surface or butt hinges, often visible
Typical reveal measurement ~1/2" (up to 1" on older builds) ~1/4" 0" (flush fit)

Before you contact a supplier, take three photos: a close-up of the face frame from the front, a shot of the reveal with a tape measure held against it, and a photo of the existing hinge with the door open so the hinge cup and mounting plate are visible. Those three images answer most of the questions a cabinet door overlay specialist would otherwise need to ask you over the phone.

How Do You Measure for Partial Overlay Cabinet Doors?

Measuring wrong is the single most common reason homeowners end up with doors that bind, gap unevenly, or won’t sit flush against neighboring cabinets. Get the numbers right the first time and the rest of the project moves fast.

Tools you’ll need:

  • Tape measure (a 25-foot model with a locking blade works best)
  • Straightedge or carpenter’s square
  • Marker or pencil for marking centerlines
  • Camera or smartphone
  • Digital caliper (optional, but useful for checking hinge cup depth)

Step-by-step for a single-door opening:

  1. Measure the width of the cabinet opening (the hole in the face frame), side to side, in three places: top, middle, bottom. Use the smallest number if they differ.
  2. Measure the height the same way: left side, center, right side.
  3. Decide your desired reveal. For a standard partial overlay look, use 1/2" on all four sides.
  4. Add the reveal to each side of the opening: door width = opening width + (2 × reveal). Door height = opening height + (2 × reveal).
  5. Confirm the hinge side and mark it clearly on your order sheet or diagram, since a mirrored door won’t fit.

Worked example: say your opening measures 14" wide by 24" tall, and you want a standard 1/2" reveal on every edge. Your door width becomes 14" + (0.5" × 2) = 15". Your door height becomes 24" + (0.5" × 2) = 25". That 15" by 25" door, once hung, leaves a clean half-inch strip of frame visible on all four sides.

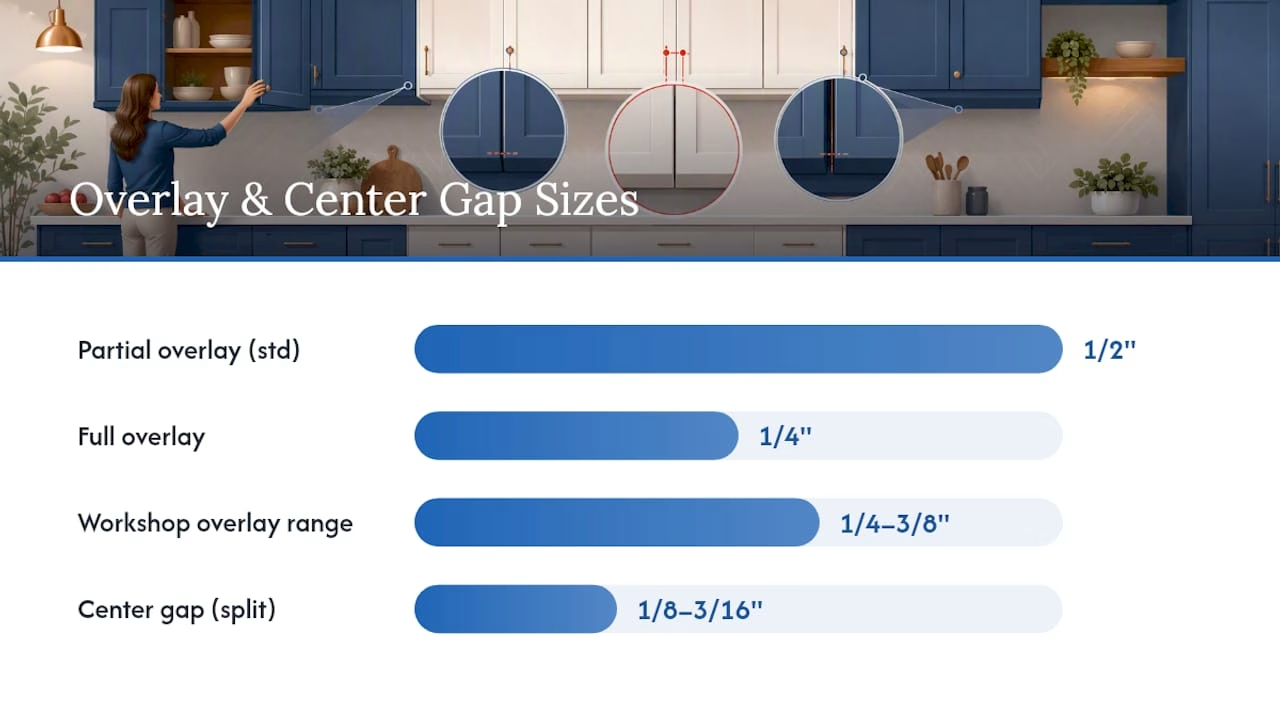
Split-door (twin) openings work the same way but need one more step. Measure the full opening width, then split it in half and subtract for the center gap between the two doors, typically 1/8" to 3/16", so the doors don’t rub when both are closed. Each door then gets its own reveal calculation on the outer edges only, since the inner edges meet at that center gap instead of overlapping frame.

Detail Typical Measurement
Standard partial overlay reveal 1/2" (some older cabinets use up to 1")
Full overlay reveal for comparison 1/4"
Center gap on split-door openings 1/8" to 3/16"
Workshop-tested overlay range 1/4" to 3/8" on custom builds

Watch for these mistakes: measuring to the inside edge of the stile instead of the true opening, forgetting that end cabinets (the ones against a wall) often need an extra reveal allowance on the exposed side, and not accounting for hinge cup depth, which can eat into your reveal if the cup sits too close to the door edge. Workshop demonstrations on building and installing partial-overlay doors show how even a 1/8" miscalculation on the reveal throws off the whole run once you’ve hung four or five doors side by side.

How Do You Measure for Partial Overlay Cabinet Doors? — overview diagram

What Hinges Work Best with Partial Overlay Doors?

Hinge choice isn’t an afterthought here. It’s the mechanical piece that decides whether your carefully measured reveal actually shows up once the door is hung.

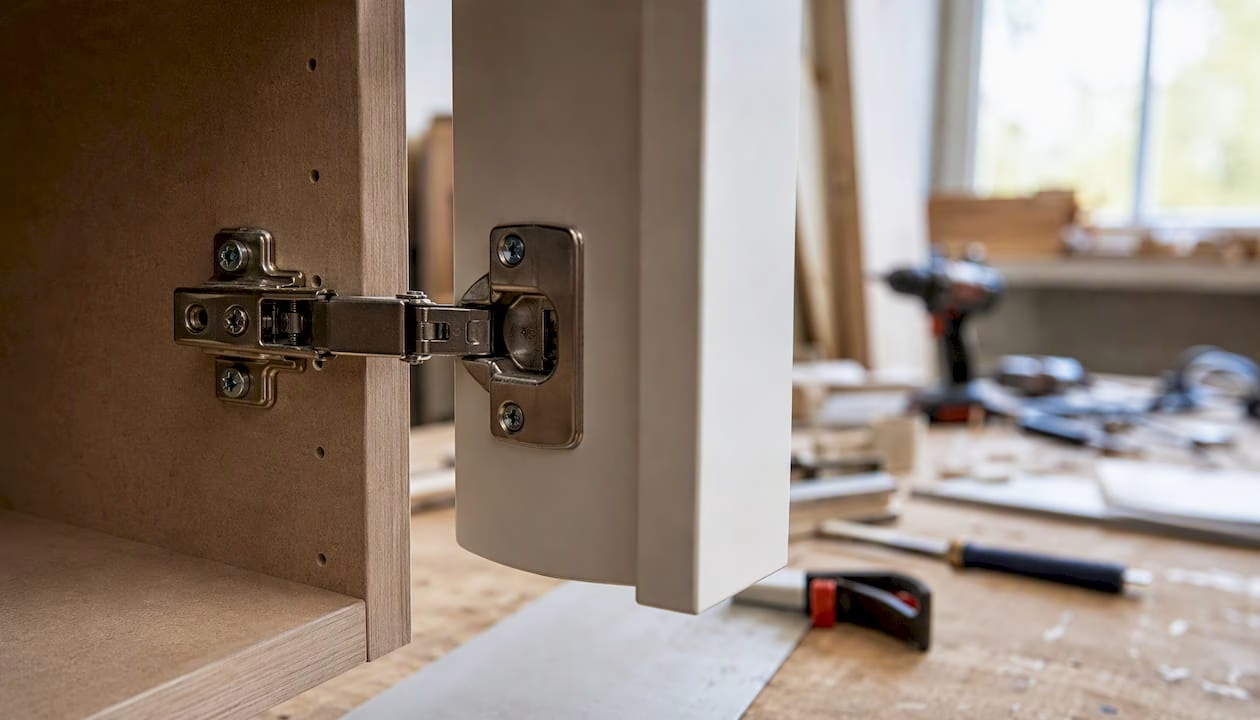
Semi-concealed hinges are the traditional match for partial overlay, visible from the front but hidden when the door is closed, and they’re built specifically to work with a face frame. Wrap-around hinges serve a similar purpose on frameless boxes retrofitted with a face-frame look. Full-overlay boxes typically use European-style concealed cup hinges instead, since those hinges are engineered for a tighter reveal and a frameless or minimal-frame construction. Semi-concealed hinges are widely recommended for partial overlay specifically because their mounting geometry is designed around a visible frame edge.

Here’s the part that trips people up: hinge cup depth and arm length directly change where the door sits once it’s closed. A hinge with a deeper cup pulls the door closer to the frame, tightening your reveal. A longer arm pushes it further out. If you measure for a 1/2" reveal but the hinge geometry doesn’t match that spec, you’ll end up with a door that’s slightly proud or recessed compared to its neighbors, even though your door dimensions were correct.

Close-up of semi-concealed cabinet hinge on partial overlay door

Pro Tip: Always confirm the exact overlay specification your hinge supplier builds around before you cut or order doors. Ask for a hinge template or a hinge-drill option so the cup location matches your calculated reveal exactly, rather than guessing and adjusting after the fact.

For a deeper look at hinge types and mounting options, The Door Maker’s guide to full overlay cabinet hinges breaks down the mechanical differences in more detail, which is useful even if you’re comparing against a partial-overlay setup.

Which Materials and Rooms Suit Partial Overlay Best?

Partial overlay doors show more surface area of both the door and the surrounding frame, so the materials you choose need to hold up under closer inspection.

  • MDF takes paint smoothly and resists warping, a solid choice for painted partial-overlay doors in busy kitchens.
  • Solid wood brings the traditional grain and depth that partial overlay’s visible frame is built to showcase, though it moves more with humidity than engineered options.
  • Thermofoil offers a low-maintenance, moisture-resistant surface that works well in laundry rooms or bathrooms where partial overlay is common.
  • Painted veneer balances cost and appearance, giving a furniture-like finish without solid wood pricing.

Partial overlay shows up most often in traditional and farmhouse kitchens, where the visible frame is part of the intended look rather than something to hide. It’s also a practical pick for laundry rooms, mudrooms, and garages, spaces where a forgiving fit matters more than a showroom-tight reveal, and for refacing older framed cabinets that were never built with full-overlay tolerances in mind.

One design detail worth planning around: match your stile and rail widths, and any moulding profile, to the visible reveal. A wide moulding against a narrow half-inch reveal reads as busy and mismatched, while a slimmer profile keeps the whole cabinet run looking intentional. Browsing cabinet door styles built for kitchens before you order can help you see how different profiles behave against a standard reveal.

What Does Partial Overlay Cost, and How Long Does It Last?

Partial overlay tends to cost less than full overlay, largely because the doors themselves are smaller and the boxes don’t need the same precision joinery that full-overlay or inset construction demands. Full overlay can run up to about 16% more than partial overlay on a comparable project, driven mostly by larger door panels, higher material use, and the tighter tolerances required during installation.

Door and hardware choices drive most of that price gap, not the cabinet boxes themselves. Doors sized for full overlay use more material per unit, concealed European hinges cost more than semi-concealed hardware, and the labor to hang a tight-reveal door correctly takes longer than hanging a partial-overlay door with room for adjustment.

There’s a durability upside too. The face frame on partial-overlay cabinets isn’t just decorative, it adds structural rigidity to the box itself, and it takes on some of the wear that would otherwise land directly on the door edges. That’s part of why partial overlay remains the traditional standard in American framed cabinetry even as full-overlay and frameless styles have gained popularity in modern kitchens.

Keep partial overlay looking sharp with a short maintenance routine:

  • Check and tighten hinge screws twice a year; loose hinges are the leading cause of doors that drop or drag against the frame.
  • Touch up painted or thermofoil edges as soon as chips appear, before moisture gets underneath the finish.
  • Watch humidity levels in the kitchen or laundry room, since swings in moisture cause solid wood doors to swell or shrink, which shows up fastest as a changing reveal gap.

How Do You Choose the Right Overlay for Your Project?

Run through this checklist before you request quotes or place an order:

  • Confirm the style you want (traditional versus modern) since that decision alone often settles the overlay question.
  • Set a realistic budget range and compare it against the roughly 16% cost gap between partial and full overlay.
  • Double check your measurements against the formulas above, ideally with a second person confirming the numbers.
  • Decide on hinge type before you order doors, not after.
  • Request a sample door or mockup if you’re unsure how a finish or profile will look against your reveal.
  • Confirm the exact overlay dimension is written on your order drawing, not just implied.

When you’re talking to a supplier, ask these questions directly:

  1. What overlay dimension does your standard door assume, and can it be customized?
  2. Do you provide hinge templates or hinge-drilling as an add-on?
  3. Can I order a single sample door before committing to the full run?
  4. What’s the lead time, and what’s your policy if a measurement comes back wrong?

Red flags on a quote or drawing include a missing hinge specification, a vague overlay number (something like “standard overlay” with no inches attached), or no sample-door option offered at all. If you want a fast gut check: traditional kitchen, tighter budget, older or slightly uneven walls, that combination points to partial overlay almost every time. Modern kitchen, flexible budget, newer square construction points toward full overlay instead.

What Should You Know from The Door Maker’s Measuring Process?

Handling custom cabinet door orders day in and day out surfaces a few patterns worth passing along. A handful of practical habits consistently separate a smooth order from one that needs a remake.

  • Measure every opening on a run individually, even if the cabinets look identical. Older boxes settle unevenly over time.
  • Photograph the face frame straight on, with the tape measure visible in frame, rather than at an angle that distorts the reveal.
  • Always confirm hinge cup location and depth before finalizing door dimensions, since that geometry determines your actual finished reveal.
  • Request hinge-drill options whenever precision matters, rather than drilling on-site and hoping the reveal lands evenly.
  • Order a sample door if you’re choosing a new finish or color, since screen colors rarely match painted or stained wood in person.

The Door Maker’s online configurator takes the overlay number you enter and calculates the finished door width and height automatically, factoring in your reveal preference and the opening dimensions you provide, then flags recommended hinge-drill locations based on that same overlay input. It’s built to remove the manual math from the process outlined earlier in this guide, though understanding that math still helps you catch an entry error before it becomes a cutting error. The step-by-step ordering process walks through exactly how measurements, design choices, and final order details connect.

A Practical Take on Partial Overlay

Homeowners often assume full overlay is the “upgrade” and partial overlay is the compromise, but that framing misses what partial overlay actually does well. The visible frame isn’t a limitation, it’s a forgiving design feature that hides the small imperfections every older home has, and it happens to match the traditional kitchen look a lot of buyers still want when they resell. For most kitchen and utility-room projects working with an existing framed cabinet box, partial overlay is the more practical choice, not just the cheaper one.

How The Door Maker Simplifies Partial Overlay Orders

Getting a partial-overlay reveal to look consistent across a whole kitchen comes down to accurate measurements and hardware that matches your spec, and that’s exactly where a lot of DIY orders go sideways. Tdm-thedoormaker built its process around removing that guesswork: enter your opening dimensions and reveal preference into the online configurator, choose from more than 30 door styles and 130-plus finishes, and get doors sized to within 1/10,000 of an inch.

Tdm-thedoormaker

You also get add-on options most big-box retailers don’t offer, hinge-drill selection matched to your existing hardware, sample doors so you can check color and profile in person before committing, and video walkthroughs for every step of the measuring and ordering process. If you’re still deciding whether refacing makes more sense than a full cabinet swap, The Door Maker’s comparison of refacing versus replacement lays out the cost and scope differences plainly. When you’re ready, measure your openings using the steps above, then head to the configurator to enter your dimensions and request a sample door before placing your full order.

Key Takeaways

Partial overlay cabinets balance cost, durability, and forgiving installation by leaving a consistent half-inch frame reveal that hides minor structural imperfections.

Point Details
Standard reveal size Plan for a 1/2" reveal on partial overlay; older builds may use up to 1".
Cost advantage Full overlay can run up to 16% more due to larger doors and tighter tolerances.
Measure before you order Use the door width formula (opening width + 2 × reveal) from the measurement section above.
Match hinges to your reveal Confirm hinge cup depth and arm length with your supplier before cutting doors.
Order through a configurator The Door Maker’s configurator converts your overlay input into finished door dimensions and hinge-drill placement.

Sources

FROM THE SAME CATEGORY

Sep 8 2026 BY Ksenija Lebec, Blog

Landlords: inspect cabinets, run vacancy based ROI, budget $1,000–$13,000, and plan 1–3 day refacing installs with bulk order tips.

Build a Door MADE TO FIT YOU!

MDF Door Paint Prep: How to Get a Pro Finish

MDF Door Paint Prep: How to Get a Pro Finish

Seal the edges, prime with a shellac or solvent-based product, and apply multiple thin coats. That is the short version of MDF door paint prep, and every step that follows exists to protect those three principles. Skip the edge sealing and you will have fuzzy, swollen borders no amount of topcoat can hide. Reach for a water-based primer on raw edges and you will raise fibers before the first coat dries. Rush the coats and you will trap solvent, get brush marks, and wonder where you went wrong. Done right, a single door takes several days from bare panel to rehang, including dry windows.

Here is a quick checklist to orient the project before you read the detail:

  • Protect your workspace and put on PPE (N95 respirator, safety glasses)
  • Inspect the door: face, edges, routed profiles, and any prior finish
  • Seal and fill edges with thinned drywall compound, Zinsser BIN shellac, or a PVA glue-size
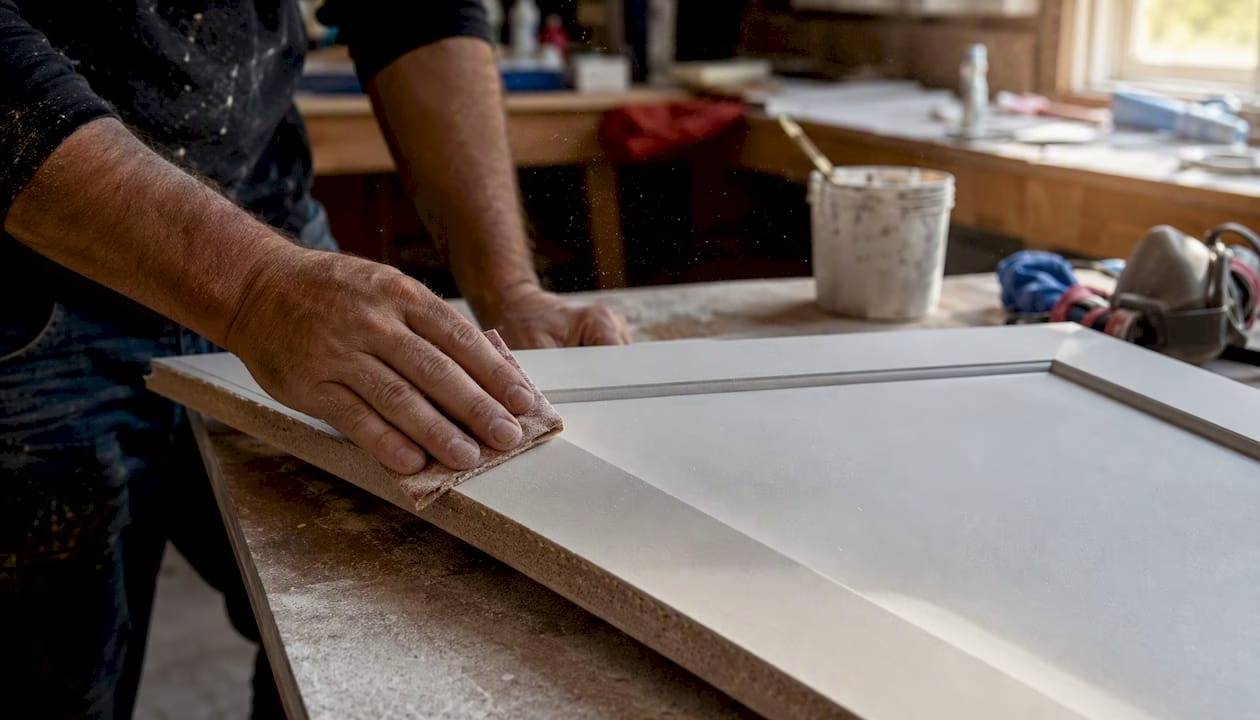
  • Sand faces at 220 grit, edges at 150 then 220 grit; vacuum and tack-cloth thoroughly
  • Prime with a shellac-based or solvent-based primer (two coats minimum)
  • Apply two or more thin topcoats, sanding lightly at 320 grit between them
  • Finish with a durable sealer on high-traffic doors; allow 30 days for full cure before heavy cleaning

Pro Tip: Before committing to a full set of doors, run the entire process on a scrap piece of MDF cut from the same sheet. You will catch edge-sealing gaps and primer incompatibilities before they cost you a door.


Key Takeaways

Sealing edges before any water-based product touches them is the single most important step in MDF door paint prep, and skipping it causes most of the finish failures DIYers encounter.

Point Details
Seal edges first Use Zinsser BIN shellac or thinned joint compound before any primer or paint touches raw edges.
Use the right primer Shellac-based (BIN) or solvent-based (KILZ) primers prevent fiber raising on raw MDF; avoid latex as the first coat.
Apply multiple thin coats Two primer coats and two topcoats minimum; thin coats with inter-coat sanding outperform heavy single coats.
Sand between every coat 220 grit between primer coats; 320 grit between topcoats; always tack-cloth before the next coat.
Allow full cure time Paint feels dry in hours but needs 30 days to fully harden before heavy cleaning in high-use areas.
Tdm-thedoormaker option Pre-finished custom doors skip the prep entirely and arrive sized to 1/10,000″ with a factory-applied finish.

Table of Contents

What does MDF door paint prep actually involve?

MDF (medium-density fiberboard) is a manufactured panel made from wood fibers, wax, and resin pressed under heat. The face is factory-sanded to roughly 150 grit and relatively smooth. The edges are a different story: they are porous, thirsty, and will swell or fuzz if you apply any water-based product without sealing them first. General Finishes confirms that edges need to be sanded around 150 grit and sealed with filler or joint compound before any primer goes on, while the face needs only a light scuff and priming.

The face and the edge behave like two different materials. Treat them that way and the rest of the process falls into place.


Protect your workspace, your lungs, and gather your tools

MDF dust is not ordinary sawdust. The resin binders that hold the fibers together produce fine, sticky particles that stay airborne longer than wood dust and irritate the respiratory tract. An N95 or P2 respirator is the minimum; a half-face respirator with P100 cartridges is better for extended sanding sessions. Add safety glasses or goggles, and disposable coveralls if you are working indoors.

MDF dust safety respirator and goggles

Lowe’s how-to guidance puts protecting the work area and wearing a mask and eye protection as the first step in the sequence, before any sanding or priming begins. That sequencing is deliberate: once dust is in the air, it settles on every surface you are about to prime.

Workspace setup:

  • Lay drop cloths under and around the door
  • Tape off any adjacent surfaces or hardware you are not removing
  • Use a vacuum with a HEPA or fine-dust filter bag; a shop vac with a standard filter recirculates MDF particles
  • Keep a tack cloth and a clean lint-free rag within reach at all times

Tool checklist:

  • N95 or P100 respirator, safety glasses, disposable gloves
  • Random-orbit sander (use on a low setting; aggressive sanding raises fibers)
  • Sanding blocks and a sanding sponge for profiles and edges
  • 120, 150, 220, and 320 grit sandpaper
  • Foam roller (short nap, 4-inch for doors), angled brush for profiles
  • Putty knife and mixing cup for filler
  • Tack cloths (several)
  • HVLP sprayer if available (rental is a practical option for a full kitchen set)

Inspect the MDF door before you touch a sander

Not all MDF is equal. Higher-density panels machine more cleanly and need less remedial prep. Lower-density boards show fiber tear-out at routed profiles, rough edges, and sometimes pitting across the face. WoodWeb’s knowledge base notes that machining quality and panel density directly affect how much prep work a door needs before it will hold a smooth finish.

Run your hand across the face and edges before you do anything else. You are looking for:

  • Face: pitting, machine marks, fiber fuzz, or any prior finish (paint, oil, wax)
  • Routed profiles: tear-out, chipped corners, or rough transitions where the router bit exited
  • Edges and ends: porosity level, any delamination, chips, or swelling from prior moisture
  • Center panel (if raised): gaps at the glue line, pitting, or uneven surface

Remove hardware and take the door off its hinges for bench work whenever possible. Working flat gives you better control over filler and primer application, and gravity keeps wet product from running into profiles.

Pro Tip: If the edges show significant delamination, deep chips, or the face has extensive pitting across a large portion of its area, factor in the repair time honestly. A door in that condition can take significantly longer to prep than a clean one. At that point, ordering a custom pre-finished door is often faster and cheaper than the labor of restoration.


How to seal porous edges and fill damage before priming

Edges are where MDF paint prep either succeeds or fails. The end-grain structure of the compressed fibers absorbs liquid like a sponge, which means a water-based primer applied directly to a raw edge will raise fibers, cause swelling, and leave a texture that no amount of sanding fully corrects. Seal first, always.

CompositePaint’s MDF guide ranks the edge-finishing options this way:

  1. Thinned drywall joint compound (best fill, slowest): thin to a creamy consistency and apply two passes with a putty knife, letting each pass dry fully. It fills well and sands to a feathered profile, but adds time.
  2. Zinsser BIN shellac-based primer (fast, sands well): brush or roll directly onto raw edges. It penetrates and locks fibers quickly, dries in 45 minutes, and sands cleanly. This is the go-to when time matters.
  3. PVA glue-size (cheap, effective for small jobs): mix PVA (white glue) with water at roughly 10:1 and brush onto edges. It seals adequately on a budget but does not fill chips or pitting.

For chips, dents, and pitting, Timbermate water-based wood filler is a trusted choice among cabinet painters. It sands cleanly, accepts primer well, and does not shrink significantly on thin applications. For deeper defects, a lightweight spackle works on the face; Bondo (auto-body filler) is an option for structural chips on edges where you need a fast, hard fill.

Application sequence for edges:

  • Apply your chosen sealer or filler in two thin passes rather than one thick one
  • Let the first pass dry completely before the second (check the product’s recoat window)
  • Sand edges at 150 grit after the first pass to knock down any raised fibers, then 220 grit after the second
  • Feather the filler into the surrounding surface so there is no visible ridge at the transition

Pro Tip: Seal both faces of the door, not just the visible side. CompositePaint confirms that sealing both sides reduces moisture migration and the risk of cupping or warping over time, especially in kitchens and bathrooms where humidity fluctuates.


Sanding grits and dust removal: what to use and when

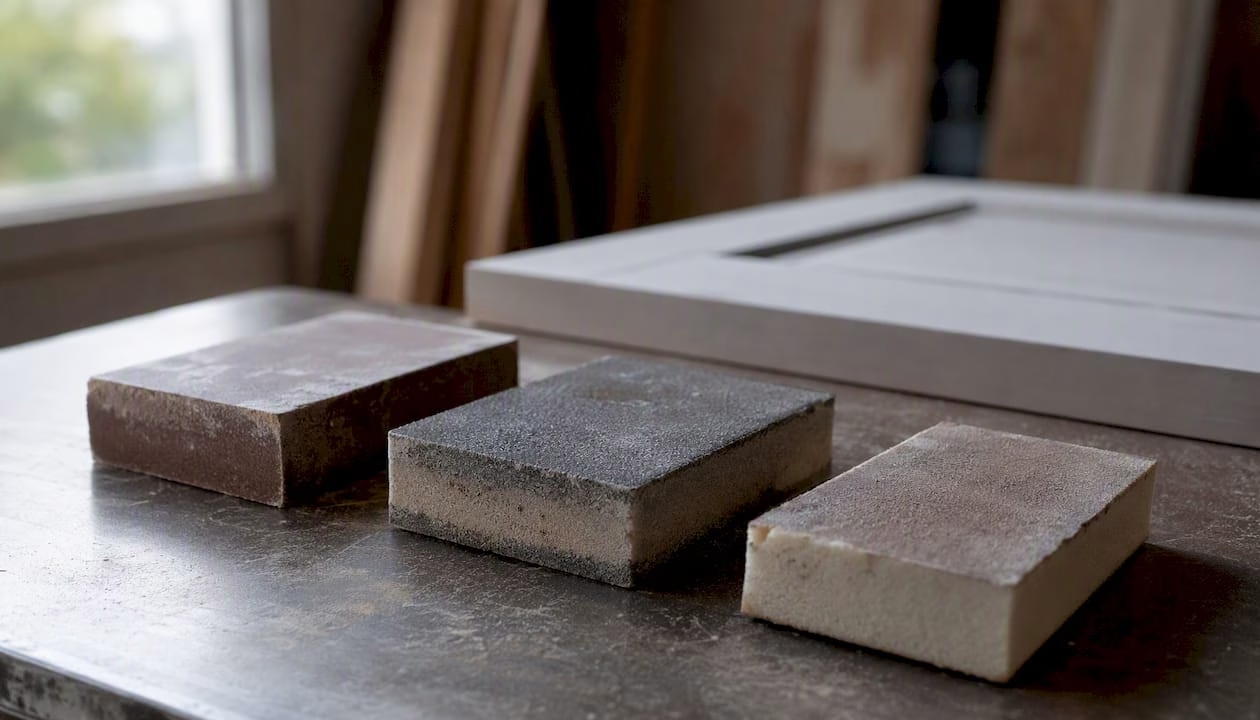
Surface First Pass Second Pass Between Finish Coats
Face 220 grit (scuff only) 220 grit after primer 320 grit
Edges 150 grit 220 grit 320 grit
Routed profiles Sanding sponge 220 Sanding sponge 220 320 sponge

Various sanding grits for MDF prep

Never use coarser than 220 grit on the face. WoodWeb’s forum contributors are consistent on this: coarser grits pull the resin-bonded fibers and create pinholes that show through the topcoat. The face only needs a light scuff to give the primer something to grip. Edges need more aggressive prep because the fiber structure is more open, but you still finish at 220 before priming.

The technique matters as much as the grit. On the face, use a sanding block and move with the grain direction of the surface veneer, applying light, even pressure. On edges, a sanding block keeps the surface flat; a sanding sponge handles profiles without digging in.

Dust removal sequence:

  • Vacuum the entire door with a brush attachment, including profiles and corners
  • Follow immediately with a tack cloth, wiping in one direction rather than back-and-forth
  • Use compressed air (if available) to blow out deep profile grooves before vacuuming
  • Repeat the tack-cloth pass right before priming, even if the door looks clean

MDF dust is fine and sticky. It clings to surfaces and will show as texture under primer if you skip the tack-cloth step. Wear your respirator during sanding and for at least 10 minutes after, while airborne particles settle.


Which primer works on MDF and how to apply it correctly

The primer decision is the most consequential choice in the whole process. Water-based latex primers applied directly to raw MDF edges raise fibers and cause swelling. Bob Vila’s MDF painting guide is direct: prime raw MDF with a solvent-based primer such as Zinsser BIN or KILZ, and avoid water-based primers for the initial seal.

Primary primer options:

  • Zinsser BIN (shellac-based): the standard recommendation for locking MDF edges. It penetrates fast, dries in 45 minutes, and sands to a smooth surface. The shellac base does not raise fibers. Downside: strong odor, requires denatured alcohol for cleanup.
  • KILZ Original (oil/solvent-based): excellent stain-blocking and adhesion on raw MDF. Slower dry time than BIN (1 hour), but easier cleanup with mineral spirits and slightly less odor.
  • General Finishes White Undercoat: a trusted option among professional cabinet painters for countering MDF’s natural brown tone when painting whites or light colors. It builds well and sands cleanly between coats.
  • INSL-X Stix (waterborne bonding primer): a high-adhesion waterborne option that some pros use after an initial shellac seal coat on edges. Not a substitute for the first seal, but a solid second-coat choice.

Pro Tip: If you are painting a white or off-white topcoat over MDF, the panel’s brown tone will bleed through a standard gray or white primer in thin coats. General Finishes White Undercoat or a tinted BIN (tinted to near-white at the paint counter) gives you a neutral base that requires fewer topcoats to achieve full opacity.

How to apply primer:

  • Apply two coats minimum; CompositePaint’s two-coat rule is the baseline for MDF
  • Use thin, even coats rather than one heavy build coat; flooding edges causes runs and uneven sealing
  • For the first coat, a foam roller covers the face efficiently; use a brush for profiles and edges
  • Allow full dry time between coats (check the product data sheet, not just the label)
  • Sand lightly at 220 grit between primer coats to knock down any raised texture, then tack-cloth before the next coat

Common primer mistakes:

  • Applying latex primer directly to raw edges (raises fibers immediately)
  • Flooding edges with too much product in one pass (causes runs and uneven sealing)
  • Skipping the inter-coat sand (leaves texture that telegraphs through the topcoat)
  • Using only one primer coat on MDF (never enough coverage or sealing)

How to apply paint: brush, roll, or spray for a smooth result

The application method shapes the final finish more than the paint brand does. For cabinet-door quality results, spraying with an HVLP or airless sprayer produces the smoothest surface. Rolling with a short-nap foam roller is the practical choice for most DIYers and gives a near-spray finish if you back-brush lightly to level the stipple. Brushing alone, without rolling, leaves brush marks that are difficult to sand out on a flat panel.

Stepwise application:

  1. Confirm the primed surface is clean, dust-free, and lightly scuffed at 220 grit
  2. Apply the first topcoat as a thin, even film; do not try to achieve full coverage in one pass
  3. Allow the full recoat window (waterborne alkyds typically 2–4 hours; check your product’s data sheet)
  4. Sand lightly at 320 grit, then tack-cloth before the second coat
  5. Apply the second topcoat; for most doors, two coats of a quality paint over two primer coats is sufficient
  6. For a truly factory-level finish, a third thin coat sanded at 400 grit before the final pass eliminates any remaining texture

Topcoat choices:

  • Waterborne alkyd enamels (Benjamin Moore Advance, Sherwin-Williams Emerald Urethane): level exceptionally well, dry hard, and are the current professional standard for painted cabinet doors
  • High-quality acrylic enamels: a solid choice; look for products with a high solids content (above 35%) for better build and durability
  • Avoid flat or matte sheens on doors; semi-gloss or satin are the practical range for painted doors, balancing durability with a forgiving surface

Pro Tip: Professional forum contributors describe the mindset as “surrendering” to thin coats. The instinct to load more paint to cover a defect always backfires on MDF. Thin coats, patience, and inter-coat sanding are what separate a durable finish from one that peels within a year.

Allow 30 days for full cure before aggressive cleaning in high-use areas. The paint may feel dry to the touch in hours, but the film continues to harden for weeks.


Choosing a durable topcoat or sealer for door surfaces

Not every painted door needs a separate protective topcoat, but high-traffic doors benefit from one. Kitchen cabinet doors, bathroom vanity doors, and any door that gets touched with wet or greasy hands will outlast an unprotected paint film by years when a sealer is added.

Topcoat options:

  • Water-based polyurethane: the most accessible option for DIYers; applies over cured acrylic or alkyd paint; adds a hard, cleanable surface. Look for a product rated for cabinetry or floors rather than a general-purpose poly.
  • Conversion varnish: the professional cabinet shop standard; extremely hard and chemical-resistant, but requires spray application and careful mixing. Not practical for most DIY setups.
  • Lacquer (waterborne): fast-drying and sandable; used in shop workflows for speed. Requires good ventilation and ideally a spray setup.
  • Wax: not appropriate for doors. Wax softens with heat and cannot be cleaned with detergents without stripping the finish.

Compatibility check before you apply:

  • Confirm the sealer is compatible with your paint’s resin chemistry (oil-based sealer over waterborne paint can cause adhesion failure)
  • Read the product’s technical data sheet (TDS) for the recommended intercoat window and surface prep
  • Test on a scrap piece painted with the same system before applying to the door

Pro Tip: For color guidance before you commit to a sheen or topcoat, this resource on interior door color is worth a quick read. Sheen and color interact: a high-gloss sealer amplifies surface imperfections, while satin hides minor texture variations.

Decorative trim and low-traffic doors generally do not need a separate topcoat if the paint system is a quality alkyd enamel. Save the extra step for where it earns its keep.


Step-by-step workflow and realistic timeline for one door

Day 1 (2–3 hours active work):

  1. Remove hardware; take the door off hinges and lay it flat on sawhorses
  2. Inspect face, edges, profiles, and ends; note repairs needed
  3. Sand edges at 150 grit; sand face at 220 grit (scuff only)
  4. Apply edge sealer (Zinsser BIN or thinned joint compound); let dry per product instructions
  5. Fill chips and pitting with Timbermate or lightweight spackle; let dry
  6. Sand filled areas smooth (150 then 220 on edges; 220 on face); vacuum and tack-cloth
  7. Apply first primer coat; let dry fully (45 minutes for BIN; 1 hour for KILZ)

Day 2 (1.5–2 hours active work):

  1. Lightly sand primed surface at 220 grit; vacuum and tack-cloth
  2. Apply second primer coat; let dry fully
  3. Inspect for any remaining texture or pitting; spot-fill if needed
  4. Apply first topcoat; let dry to recoat window (2–4 hours for waterborne alkyd)
  5. Sand lightly at 320 grit; tack-cloth

Day 3 (1–1.5 hours active work):

  1. Apply second topcoat; let dry overnight
  2. Apply sealer if required (high-traffic doors); let cure per TDS
  3. Rehang door and reinstall hardware after 24–48 hours dry time; do not slam or stress the finish
  4. Wait 30 days before cleaning with anything stronger than a damp cloth

Quick single-door checklist:

  • Remove hardware and door
  • Inspect and plan repairs
  • Seal edges; fill defects
  • Sand, vacuum, tack-cloth
  • Two primer coats with inter-coat sand
  • Two topcoats with inter-coat sand
  • Sealer (if needed)
  • Rehang after 24–48 hours

Common finish failures and how to fix them

Fuzzy edges: caused by water-based primer on unsealed raw edges. Fix: sand back to bare MDF at the edge (150 grit), re-seal with Zinsser BIN, let cure, then re-prime.

Hands sanding and sealing fuzzy MDF door edge

Pinholing on the face: caused by sanding with too coarse a grit (below 220) or by applying primer too heavily over a dusty surface. Fix: sand the affected area at 220 grit, tack-cloth, and apply a thin primer coat. If pinholes are deep, skim with Timbermate, sand, and re-prime.

Brush or roller marks in the topcoat: caused by overworking wet paint or using a roller with too long a nap. Fix: sand at 320 grit once fully dry, tack-cloth, and apply a thin leveling coat. Switch to a short-nap foam roller or an HVLP sprayer.

Poor adhesion (peeling or flaking): usually caused by skipping primer, using an incompatible primer/paint combination, or painting over a contaminated surface. Fix: strip the affected area back to bare MDF or primer, degrease with a mild detergent solution (warm water and a small amount of dish soap works; The Spruce recommends warm water and mild detergent for cleaning painted cabinet surfaces), let dry completely, and re-prime correctly.

Swelling at edges: caused by moisture penetration before sealing. If the swelling is minor, sand back aggressively, re-seal, and re-prime. If the edge has delaminated or the panel has cupped, the door is past practical repair.

Pro Tip: When a door has multiple compounding problems (swelling plus delamination plus pitting), the honest calculation is time versus replacement cost. A single custom door from a supplier like Tdm-thedoormaker, sized to your exact opening, often costs less than the hours of remedial work on a badly damaged panel.


Products and tools available to Canadian DIYers

Canadian DIYers have solid access to the key products this process calls for, mostly through Home Depot Canada, Rona, and independent paint stores.

Primers and sealers:

  • Zinsser BIN shellac-based primer: available at Home Depot Canada and most paint stores; sold in quarts and gallons. The go-to for edge sealing.
  • KILZ Original (oil-based): available at Home Depot Canada; the solvent-based option for stain blocking and strong adhesion on raw MDF.
  • General Finishes White Undercoat: available through specialty paint retailers and online; worth sourcing for white or light-color topcoat projects.

Fillers:

  • Timbermate water-based wood filler: available at Rona, Lee Valley, and some Home Depot locations; comes in several tones including a neutral that accepts paint well.

Sandpaper:

  • 3M Pro Grade Precision and Norton ProSand are widely available in the grits you need (120, 150, 220, 320); sold in multi-packs at most big-box stores.

Rollers and brushes:

  • Purdy and Wooster foam rollers (4-inch, short nap) are the standard choice for door panels; available at most paint counters.

Pro Tip: Before buying a full gallon of any primer or topcoat, ask the paint counter for a quart or check whether the product is available in a sample size. Run your test piece with the exact products you plan to use on the full set. Recoat windows and dry times on the product’s technical data sheet (TDS) are more reliable than the label, and the TDS is usually downloadable from the manufacturer’s website.

HVLP sprayers are available for rent at most Home Depot Canada locations. For a full kitchen set of doors, a one-day rental is worth it. For one or two doors, a quality foam roller produces a finish close enough to spray that the rental cost rarely pays off.


When DIY prep is worth it and when it is not

There is a version of this project that goes beautifully: you take your time, seal the edges properly, use the right primer, apply thin coats, and end up with doors that look like they came from a factory. That outcome is genuinely achievable for a patient DIYer with the right products.

But there is another version that most guides do not mention. MDF is unforgiving of shortcuts in a way that solid wood is not. A missed edge, a single water-based primer coat on a raw end, or one coat applied too thick can set off a chain of repairs that doubles the project timeline. The material’s density and machining quality affect how much prep it needs, and you often do not know which category your doors fall into until you are already mid-project.

The DIY route makes the most sense when you have a small number of doors, you enjoy the process, and you have the time to do it across several days without rushing dry windows. It makes less sense when you are working with a full kitchen set, the doors have significant edge damage, or your timeline is tight.

Tdm-thedoormaker’s measure-design-order workflow exists precisely for that second scenario. The advantages of MDF as a cabinet door material are real, but they show up most reliably when the finishing is done under controlled shop conditions, not in a garage in February. A pre-finished door arrives ready to hang, sized to 1/10,000″, with a factory finish that no brush or roller will replicate at home.


Pre-finished custom doors: a practical alternative to DIY painting

If the prep process described here sounds like more time than your project allows, Tdm-thedoormaker offers a direct alternative. Custom cabinet doors are available in over 30 styles and 130+ colors and finishes, sized precisely to your measurements through an online configurator that walks you through measure, design, and order in three steps.

Tdm-thedoormaker

The tradeoff is straightforward: a pre-finished door costs more upfront than a sheet of raw MDF and a can of primer. What you get in return is a factory-applied finish that skips three days of prep, eliminates the risk of edge swelling or primer failure, and arrives ready to hang. For a full kitchen set, the time saved typically outweighs the price difference. Sample doors and color swatches are available so you can confirm the finish before committing to the full order. Visit Tdm-thedoormaker to configure your doors and request samples.


Sources

The following sources were used to build this guide. Each is worth bookmarking for product-specific details and deeper technical background.

Always download the technical data sheet (TDS) for any primer, paint, or sealer you use. The TDS gives you the actual recoat windows, dry times, and surface prep requirements that the label summarizes. Manufacturer websites publish these for free, and they are the most reliable reference for timing your project correctly.

FROM THE SAME CATEGORY

Sep 8 2026 BY Ksenija Lebec, Blog

Landlords: inspect cabinets, run vacancy based ROI, budget $1,000–$13,000, and plan 1–3 day refacing installs with bulk order tips.

Build a Door MADE TO FIT YOU!

Frameless Door Sizing: A Complete Guide for Canadian Homeowners

Frameless Door Sizing: A Complete Guide for Canadian Homeowners

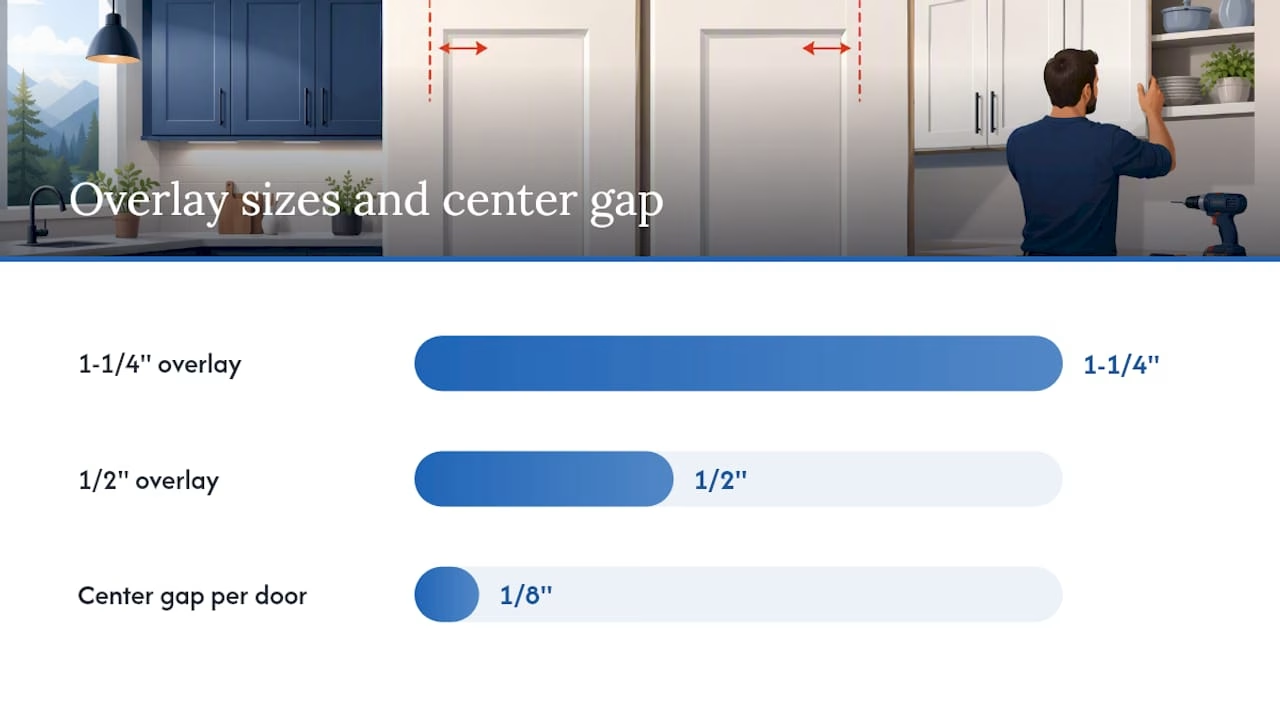
For frameless cabinet refacing, size every door so adjacent reveals are 1/8" (3 mm), and choose your hinge before you finalize any width. Those two decisions control everything else in the process.

The standard reveal for full-overlay frameless cabinets is 1/8". When two doors meet at the center, each door loses 1/16" from its width so the pair together totals that 1/8" clearance. Frameless cabinetry uses 35 mm concealed European hinges with a cup drilling depth of typically 12–13 mm, mounted directly to the cabinet side panel.

Before you measure a single opening, run through this quick checklist:

  • Identify your cabinet type (frameless vs. face frame) using the field test below
  • Choose your hinge type and overlay rating
  • Measure each opening inside-to-inside for both width and height
  • Apply the correct formula for your overlay style
  • Confirm hinge cup depth matches your door thickness
  • Order with tolerances noted

Key Takeaways

Frameless door sizing requires choosing your hinge and overlay before measuring, applying the 1/8" reveal formula to every opening, and supplying calculated door dimensions (not raw opening sizes) when you order.

Point Details
Hinge first, then measure Lock in hinge type and overlay rating before calculating any door width or height.
Standard reveal is 1/8" Each door edge needs 1/8" clearance; double doors each lose 1/16" at the center seam.
35 mm hinge, 12–13 mm cup Confirm cup depth matches door thickness before ordering pre-drilled doors.
Use the formula Door Width = Opening + (2 × Overlay) − (2 × Gap); run it through a calculator to verify.
Tdm-thedoormaker configurator Accepts measured openings, hinge and bore options, and cuts to 1/10,000" for Canadian orders.

Table of Contents

What are the right formulas for frameless door sizing?

The math behind custom frameless door sizing is straightforward once you know your overlay and reveal. Here are the core formulas:

Full-overlay single door:
Door Width = Opening Width + (2 × Overlay) − (2 × Reveal)
Door Height = Opening Height + (2 × Overlay) − (2 × Reveal)

Double doors meeting at center:
Each Door Width = (Opening Width ÷ 2) + Overlay − Reveal

Inset door:
Door Width = Opening Width − (2 × Gap)
Door Height = Opening Height − (2 × Gap)

The cabinet door calculator formula used by most online tools follows: Door Width = Opening + (2 × Overlay) − (2 × Gap). Running your numbers through a calculator before ordering cuts errors significantly.

Three worked examples

  1. Single full-overlay door. Opening is 14" wide × 28" tall. Standard overlay is 1/2" per side, reveal is 1/8" per side.
    Door Width = 14 + (2 × 0.5) − (2 × 0.125) = 14 + 1 − 0.25 = 14.75"
    Door Height = 28 + 1 − 0.25 = 28.75"

  2. Double doors meeting at center. Opening is 24" wide × 30" tall. Same overlay and reveal.
    Each Door Width = (24 ÷ 2) + 0.5 − 0.0625 = 12 + 0.5 − 0.0625 = 12.4375" (≈ 12-7/16")
    Door Height = 30 + 1 − 0.25 = 30.75"
    Note: each door subtracts 1/16" (not 1/8") at the center seam so the pair totals 1/8" clearance.

  3. Inset door. Opening is 15" wide × 24" tall. Gap is 1/8" per side.
    Door Width = 15 − (2 × 0.125) = 14.75"
    Door Height = 24 − (2 × 0.125) = 23.75"

Always round to your supplier’s stated tolerance, typically 1/32" or finer. Tdm-thedoormaker cuts to 1/10,000" precision, so you can supply decimal dimensions with confidence.

How do you measure frameless cabinet openings accurately?

Measuring doors for frameless cabinets starts with one non-negotiable rule: measure inside-to-inside across the cabinet opening, not across the exterior box. Record both width and height, then measure again to confirm.

Quick field test to identify your cabinet type. Open a door and look at the opening edge. If you see a 1–2" solid-wood border framing the opening, you have a face-frame cabinet. If the opening goes straight to a plywood side panel with no wooden border, it’s frameless. Using face-frame overlay logic on a frameless box is the most common refacing error, and it causes doors to sit proud or bind on the side panel.

Tools you need:

  • Steel tape measure (lock it at the opening edge, not the door face)
  • Feeler gauge or digital caliper for reveal verification
  • Straightedge to check for out-of-square openings
  • Pencil and notepad or a phone for photos

Measurement template to copy into your order form:

  • Opening W × H: _____ × _____
  • Hinge side: Left / Right
  • Overlay desired: _____
  • Reveal per side: _____ (standard 1/8")
  • Door thickness: _____
  • Hinge cup option: Pre-bored / No bore
  • Quantity: _____

Use Tdm-thedoormaker’s step-by-step measuring guide to print a ready-made template before you start.

Pro Tip: Photograph the hinge mounting area and the inside face of the side panel before ordering. That image confirms whether your existing hinge plate holes are standard 32 mm system spacing, which affects whether pre-drilled doors will drop straight in.

Close-up hinge mounting holes in cabinet side panel

What hinge specs do you need to confirm before ordering?

Frameless cabinets use 35 mm concealed European hinges, and the cup drilling depth is typically 12–13 mm. That depth is not universal across all door thicknesses, so confirm it before you finalize dimensions.

Overlay Type Where Overlay Is Measured Typical Use Case
Full overlay Door covers full cabinet side panel face Single door per opening, frameless box
Half overlay Door covers half the shared partition Two doors sharing one center partition
Inset Door sits flush inside the opening Furniture-style or traditional look

Hinge geometry directly sets the overlay. Change the hinge model and you change the required door width, which is why industry guides consistently recommend choosing the hinge before measuring. A full-overlay hinge rated for 1/2" overlay on a frameless box is not interchangeable with a half-overlay hinge without recalculating every door on that run.

Before placing an order, confirm these hinge-related specs on your job sheet:

  • Cup diameter: 35 mm (standard for European concealed hinges)
  • Cup depth: 12–13 mm (verify against your door thickness)
  • Overlay rating: full, half, or inset
  • Hinge side: left or right per opening
  • Soft-close: yes or no
  • Pre-boring: requested or field-drilled

For a deeper look at hinge selection and compatibility, Tdm-thedoormaker’s full overlay cabinet hinges guide covers European hinge models and plate offsets in detail.

What mistakes cause frameless doors to fit poorly?

Most fit problems trace back to one of four errors, and most are fixable without reordering.

  • Using face-frame overlay logic on a frameless box. Overlay is measured from a different reference point in each system. On a frameless box, overlay is measured from the cabinet opening edge to the door edge. Applying face-frame math here causes doors to overhang or bind the side panel.
  • Ordering before choosing a hinge. If you swap hinge models after ordering, the overlay changes and the door width is wrong. Lock in the hinge first.
  • Wrong cup depth. A 12 mm cup in a door that needs 13 mm leaves the hinge arm proud of the door face. Re-boring is possible in the field, but it adds time and risk of tear-out.
  • Insufficient reveal between doors. Anything tighter than 1/8" raises the risk of binding from seasonal wood movement. MDF is more stable than solid wood, but even MDF doors in Canadian kitchens see enough humidity swing to make a 1/16" reveal a gamble on a wide run.

Troubleshooting after installation:

  • Gaps uneven across a run: re-check hinge plate position; most European hinges allow 2–3 mm of lateral adjustment without re-drilling.
  • Door rubs on adjacent door: confirm each door was cut 1/16" short at the center seam, not 1/8".
  • Soft-close doesn’t engage: hinge arm may be set too shallow; adjust the mounting screw depth.
  • Door sits proud of box face: cup depth is too shallow for the door thickness; re-bore or swap hinge model.

For DIY renovators tackling door replacement for the first time, common pitfalls in door replacement projects covers field-level installation errors worth reviewing before you hang the first door.

How do you prepare a complete order for The Door Maker’s configurator?

To avoid rework, supply your measured opening dimensions, specify hinge type and overlay, and request a sample door if you are unsure of finish or thickness. Complete specs on the first submission mean doors that fit without a second order.

Order workflow:

  1. Measure each opening inside-to-inside; record W × H for every opening
  2. Choose door style, thickness, and finish in the configurator
  3. Select hinge cup option (pre-bored 35 mm or no bore) and overlay type
  4. Upload photos of the hinge mounting area and side panel
  5. Enter calculated door dimensions (not raw opening dimensions)
  6. Add tolerance notes and confirm quantity per opening
  7. Place order; request color swatch or sample door if finish is undecided

Each line on your order form should include: opening W × H, finished door W × H (your calculated figure), hinge cup depth option, door thickness, hinge side (L/R), quantity, and any tolerance notes.

Tdm-thedoormaker’s cabinet door calculator lets you validate your numbers before checkout. Run every opening through it, especially double-door pairs where the center-seam math is easy to get wrong. Sample doors and color swatches are available as add-ons, and they are worth ordering when you are matching existing finishes in a kitchen that has seen a few years of use.

A supplier’s perspective on what actually saves time

Pick the hinge and overlay first, then measure to that choice. Every experienced contractor who calls in with a reorder problem started by measuring before deciding on a hinge.

The 1/8" reveal standard exists for a reason. Canadian kitchens cycle through meaningful humidity changes between winter and summer, and a reveal tighter than 1/8" on a wood or wood-veneer door is a binding problem waiting to happen. MDF doors are more forgiving, but the standard still holds as a safe default.

When openings are out of square by more than 1/4", or when the side panels show damage or non-standard hinge patterns, call a pro before ordering. Pre-drilled doors from Tdm-thedoormaker drop in cleanly when the box is sound, but a damaged side panel needs repair before new doors will hang correctly. Sample doors are available for exactly this situation: hang one, check the reveal and hinge engagement, then order the full run.

A supplier's perspective on what actually saves time — overview diagram

Tdm-thedoormaker makes frameless door sizing straightforward for Canadians

Getting from accurate measurements to doors that fit is the whole job, and Tdm-thedoormaker’s configurator is built around that sequence. You enter your measured openings, choose your overlay and hinge cup option, and the system cuts doors to your calculated dimensions with precision to 1/10,000".

Tdm-thedoormaker

Pre-drilling for 35 mm European hinge cups is available as an add-on, so doors arrive ready to hang. Over 30 door styles and 130+ colors and finishes are available, with sample doors and color swatches to confirm your choice before committing to a full order. Canadian shipping and support are included. When you are ready to move from measuring to ordering, start your custom door order through the configurator and supply your specs directly.

Sources

These guides and tools support the measurement and ordering steps covered above. Save the measurement template and your opening photos before placing any order.

FROM THE SAME CATEGORY

Sep 8 2026 BY Ksenija Lebec, Blog

Landlords: inspect cabinets, run vacancy based ROI, budget $1,000–$13,000, and plan 1–3 day refacing installs with bulk order tips.

Build a Door MADE TO FIT YOU!

Cabinet Refacing Guide: DIY Steps and Canadian Costs

Cabinet Refacing Guide: DIY Steps and Canadian Costs

Yes, you can reface your kitchen cabinets yourself, and for most homeowners with basic-to-intermediate tool skills, it’s a genuinely worthwhile project. The core requirement is patience: accurate measuring, clean and stable cabinet boxes, and a willingness to spend more than one weekend on prep before a single door goes back on. According to Forbes, DIY timelines are commonly underestimated, so plan for a long weekend at minimum, or two to three weekends for an average kitchen.

What you’ll need to get started:

  • Accurate measurements of every door opening, drawer front, and exposed end panel
  • Structurally sound cabinet boxes (plywood or MDF, not crumbling particleboard)
  • Veneer sheets or PSA (pressure-sensitive adhesive) veneer, plus adhesive and a roller
  • Replacement doors and drawer fronts in your chosen style and finish
  • Basic woodworking tools: tape measure, drill, screwdrivers, utility knife, sanding supplies, and clamps
  • A long weekend for a small kitchen, or multiple weekends for a full kitchen

On cost: This Old House reports that refacing typically costs 30%–50% less than full cabinet replacement, making it one of the most cost-effective kitchen updates available. For Canadian homeowners, a DIY materials-only budget for an average kitchen generally requires a few thousand dollars CAD, while hiring a pro can significantly increase the total depending on kitchen size and finish choices.

Key Takeaways

Cabinet refacing is a cost-effective, lower-disruption alternative to full replacement when your cabinet boxes are structurally sound and your kitchen layout works for you.

Point Details
Verify box condition first Press on interior walls and floors; any flex or soft spots means replacement, not refacing.
Measure every opening individually Apply overlay math (opening + 2× overlay) to each door; never assume adjacent cabinets are identical.
Prep determines adhesion quality Degrease twice, sand to 120-grit, and roll veneer firmly; skipping these steps causes bubbling and peeling.
Budget realistically in CAD DIY materials for an average kitchen run a few thousand dollars CAD; pro-installed refacing runs — CAD.
Tdm-thedoormaker simplifies ordering Custom doors sized to 1/10,000" with pre-bored hinge holes and sample doors reduce measurement errors and reorders.

Table of Contents

What is cabinet refacing, and is it right for your kitchen?

Cabinet refacing means replacing the visible surfaces of your cabinetry while keeping the existing cabinet boxes in place. You apply new veneer or laminate to the face frames, replace the doors and drawer fronts with new ones, and swap out the hardware. The boxes, interior shelves, and layout stay exactly as they are.

That distinction matters when you’re comparing your options. Full replacement tears out everything, including the boxes, and typically costs two to three times more. Repainting or “redooring” (swapping doors without veneering the frames) is cheaper and faster but leaves mismatched or worn face frames visible. Refacing sits between those two: it delivers a consistent, fresh look across every visible surface without the cost or disruption of a full gut.

When refacing makes sense: Your cabinet boxes are solid plywood or MDF with no warping, delamination, or structural damage. The layout works for your household. You want a significant visual upgrade without a full renovation budget. You’re comfortable with a multi-day DIY project or willing to hire a pro for installation.

Use this quick checklist to decide:

  • Reface if: Boxes are sturdy, hinges and drawer slides work, and you’re happy with the kitchen’s layout and storage configuration.
  • Repaint/redoor if: Boxes and frames are in good shape and you mainly want a color change on a tight budget.
  • Replace if: Boxes are water-damaged, particleboard is crumbling, the layout no longer works, or you need to add storage.

Pro Tip: Before committing, open every cabinet and press firmly on the interior walls and floor. Any flex, soft spots, or visible delamination is a sign the box won’t hold hinges reliably after refacing. Refacing on a failing box is money wasted.

See how refacing compares to a full remodel for a side-by-side breakdown of costs and outcomes.

What tools and materials do you need for DIY cabinet refacing?

Gathering everything before you start prevents the most common project delay: mid-job supply runs. Here’s what you’ll need, organized by category.

Must-have tools:

  • Tape measure and a fine-point pencil or marking knife
  • Cordless drill and a full set of screwdrivers (Phillips and flat)
  • Utility knife with fresh blades
  • Veneer roller (J-roller) for pressing veneer flat and eliminating air pockets
  • Random orbital sander with 80-, 120-, and 220-grit discs
  • Clamps (at least four, preferably six or more)
  • Router with a flush-trim bit, or a dedicated veneer trimmer
  • Level and a combination square

Materials:

  • PSA veneer sheets or prefinished veneer with contact cement, matched to your door finish
  • 1/4" plywood for exposed end panels (recommended by The Home Depot to create a flush, bondable surface)
  • New cabinet doors and drawer fronts in your chosen style
  • Edge banding (iron-on or PSA) to finish exposed plywood edges
  • Cup hinges (soft-close recommended) and mounting plates
  • Cabinet pulls or knobs
  • High-quality degreaser (TSP substitute or a dedicated cabinet cleaner)
  • Wood filler or epoxy for any frame repairs

Optional tools that significantly speed the job:

  • Veneer trimmer (faster and cleaner than a router for long runs)
  • Laminate slitter for cutting veneer strips to width
  • Hinge-boring jig for consistent, accurate cup-hinge holes
  • Brad nailer for attaching trim and molding

For end panels specifically, a hinge-boring jig and a laminate slitter are worth renting from a tool rental shop if you have more than two or three exposed sides. The time savings on a full kitchen easily justify the rental cost.

Choosing the right cabinet door materials for your project affects both the look and the long-term durability of the finished result.

How do you measure for new doors and drawer fronts?

Accurate measurement is where DIY refacing projects succeed or fail. A door that’s 1/8" too wide won’t close; one that’s 1/4" too narrow leaves a visible gap. Take your time here, and measure every opening twice.

Setting up your measurement sketch

Start with a simple hand-drawn sketch of your kitchen layout. Number every cabinet opening from left to right, top to bottom. For each opening, record:

  • Opening width: Measure the clear opening between the inside edges of the face frame stiles (vertical members).
  • Opening height: Measure from the bottom of the upper rail to the top of the lower rail.
  • Door type: Note whether you need full overlay, half overlay, or inset doors.

Overlay math explained

Most North American kitchens use overlay doors, meaning the door overlaps the face frame opening on all four sides. The most common overlay values are 1/2" and 1-1/4" per side.

To calculate door size for a full overlay door on a single opening:

Door width = Opening width + (2 × overlay) minus clearance

For example, with a 14" opening and 1/2" overlay on each side, your door width is 14" + 1" = 15". For two doors sharing one opening, divide the combined width by two and subtract 1/8" from each door for the center gap. The Family Handyman measurement guide walks through this math in detail for multiple door configurations.

Measurement What to record Common value
Opening width Inside stile to inside stile Varies by cabinet
Opening height Rail to rail (clear opening) Varies by cabinet
Overlay per side How far door covers face frame 1/2" or 1-1/4"
Hinge bore diameter Cup hinge hole size 35mm (standard)
Hinge bore distance from edge Center of bore to door edge 3mm–5mm from edge

Diagram of overlay math and hinge bore measurements

Pro Tip: Measure every opening individually, even if they look identical. Older kitchens often have openings that vary by 1/8" or more due to settling or original installation tolerances. Never assume two adjacent cabinets are the same size.

Ordering checklist

When placing your order, specify:

  • Exact door width and height to 1/16" (or finer, if the supplier allows)
  • Overlay value and hinge bore location (distance from edge and from top/bottom)
  • Finish, color, and edge profile
  • Whether you need pre-bored hinge holes (strongly recommended)
  • Drawer front dimensions and attachment method
  • Request sample doors or color swatches before committing to a full order

Many suppliers, including Tdm-thedoormaker, allow you to order pre-bored hinge holes and sample doors to confirm finish and fit before the full production run.

How to remove, label, and prep your cabinet frames

Disassembly is the step most homeowners rush, and it’s the one that causes the most reassembly headaches. A clear labeling system takes ten minutes to set up and saves hours later.

  1. Photograph everything first. Take wide shots of each cabinet run and close-ups of hinge positions, drawer slide types, and any existing hardware. These photos are your reference during reinstallation.
  2. Number every door and drawer front with a piece of painter’s tape on the interior face. Use a simple grid system: “U1” for upper cabinet 1, “L3” for lower cabinet 3, and so on. Family Handyman recommends labeling every component as it’s removed to avoid trial-and-error at reassembly.
  3. Remove doors by unscrewing hinges from the face frame, not from the door. Keep each hinge set with its door in a labeled zip-lock bag.
  4. Pull drawer fronts by removing the screws from inside the drawer box. Keep the screws with the front.
  5. Remove all hardware (pulls, knobs, catches) and store by cabinet number.

Prepping the frames for veneer or paint

Once the cabinets are empty and labeled, prep determines how well your veneer bonds and how long it lasts.

  • Degrease thoroughly. Kitchen grease penetrates wood grain and prevents adhesive from bonding. Use a TSP substitute or a dedicated cabinet degreaser, and wipe every surface twice.
  • Sand the face frames. Start with 80-grit to scuff the existing finish, then finish with 120-grit for a smooth substrate. Wipe away all dust with a tack cloth.
  • Repair any damage. Fill splits, gouges, or loose stiles with wood filler or two-part epoxy. Let it cure fully and sand flush before proceeding.
  • Inspect drawer slides. Replace any slides that feel rough, sticky, or loose. It’s far easier to do this now than after the new fronts are installed.

Pro Tip: Wear an N95 dust mask and safety glasses during sanding, and open windows or run a fan for ventilation. If your cabinets were painted before 1990, test for lead paint before sanding. Dispose of paint chips and sanding dust in sealed bags per your municipality’s guidelines.

How do you apply veneer to cabinet face frames?

Veneer application is the technical heart of a DIY refacing project. Done carefully, it produces a surface indistinguishable from a factory finish. Rushed, it bubbles, peels, or shows seams within months.

Hands applying wood veneer to cabinet frame

PSA veneer vs. contact cement

PSA (pressure-sensitive adhesive) veneer has a peel-and-stick backing. It’s faster and more forgiving for beginners because you can reposition it slightly before pressing it down fully. The trade-off is that PSA veneer is less tolerant of heat and humidity over time than a contact-cement bond.

Contact cement with prefinished veneer sheets creates a stronger, more permanent bond. You apply cement to both surfaces, let it tack off, then press the veneer into place. The catch: contact cement bonds on contact with no repositioning, so alignment before you press matters.

For most Canadian kitchens, PSA veneer is the practical choice for face frames. Use contact cement for large, flat surfaces like end panels where a stronger bond is worth the extra care.

The single biggest factor in veneer adhesion is surface prep, not adhesive type. A high-quality degreaser and a thorough sand are what prevent bubbling and edge lifting. Skipping either step is the most common reason veneer fails within the first year. A veneer roller pressed firmly across every square inch of the surface after application completes the bond.

Apply veneer in this order: end panels first, then face frame stiles (vertical), then rails (horizontal). This sequence means horizontal pieces overlap vertical ones at corners, which hides seams more effectively.

Trim each piece flush using a veneer trimmer or a router with a flush-trim bit. A utility knife alone leaves ragged edges that show through paint or stain. As Family Handyman notes, a veneer trimmer and flush-trim router produce much cleaner seams than a utility knife, and the difference is visible in the finished result.

Pro Tip: Work in sections no longer than 24" at a time. Longer runs are harder to align perfectly, and any bow in the veneer sheet becomes a bubble once it’s pressed. Cut your veneer slightly oversized (1/4" on each edge), press it down, then trim flush.

How do you install new cabinet doors and drawer fronts?

With the frames veneered and cured, door installation is where the project starts to look finished. The key is working methodically from one end of the kitchen to the other, checking alignment as you go rather than hanging all doors and adjusting at the end.

Hinge preparation

If you ordered pre-bored doors, your hinge cups drop straight into the existing holes. If not, use a 35mm Forstner bit in a drill press or a hinge-boring jig to drill the cup holes. A jig keeps every hole at the same distance from the door edge, which is what makes all your doors hang at the same depth.

Mount the hinge to the door first, then hold the door in position against the face frame and mark the mounting plate location with a pencil. Screw the mounting plate to the face frame, snap the hinge arm onto the plate, and check the door position before tightening fully.

Pro Tip: Avoiding common door installation mistakes starts with drilling hinge bores at a consistent distance from the door edge. Even a 1mm variation across multiple doors creates a visible depth difference when the doors are closed.

Alignment and adjustment

Modern cup hinges have three-way adjustment: in/out, up/down, and side to side. Use all three. Start by getting the gap between adjacent doors even (typically 3mm–4mm), then adjust depth so all doors sit flush. A consistent gap is what separates a professional-looking result from a DIY one.

Hands adjusting cabinet door hinge

For pulls and knobs, make a simple drilling template from a piece of 1/4" plywood or cardboard. Mark the hole position once, then use the template on every door and drawer front. This keeps hardware positions consistent across the entire kitchen without measuring each door individually.

Attaching drawer fronts

Drawer fronts attach from inside the drawer box using screws through pre-drilled holes. Before tightening, hold the front in position with clamps or double-sided tape and check the gap on all four sides. The gap between a drawer front and the cabinet door below it should match the gap between adjacent doors. Tighten the screws once the position is confirmed, then check that the front doesn’t shift when the drawer is opened and closed.

Cup hinges adjusted correctly allow doors to hang with consistent 3mm–4mm gaps. That spec is worth checking with a small spacer cut from cardboard rather than eyeballing it.

What finishing touches complete a refaced kitchen?

The difference between a refaced kitchen that looks “done” and one that looks professionally finished usually comes down to trim, caulk, and hardware coordination.

  • Crown or cove molding: Measure the top of each upper cabinet run and cut molding to length with a miter saw. Attach with a brad nailer and construction adhesive. Paint or stain to match the new doors before installation for a cleaner result.
  • Filler strips and scribe molding: Use these to close gaps between cabinets and walls or ceilings. A 1/4" gap filled with scribe molding looks intentional; the same gap left open looks unfinished.
  • Caulking: Run a thin bead of paintable latex caulk along every joint where veneer meets wall, ceiling, or countertop. Smooth with a wet finger and wipe excess immediately. For kitchen use, choose a caulk rated for high-humidity environments.
  • Touch-up paint: Keep a small amount of your frame paint or stain for touch-ups after installation. Screw holes, minor dings from installation, and caulk edges often need a light coat.
  • Hardware finish coordination: Match your pulls and knobs to your faucet and light fixtures for a cohesive look. Brushed nickel, matte black, and warm brass are all popular choices in Canadian kitchens right now.

Pro Tip: Under-cabinet lighting is easiest to install during a refacing project, before the new doors go on. LED strip lights or puck lights mounted to the underside of upper cabinets add both function and visual depth. Run the wiring before caulking so you can conceal it cleanly.

Explore kitchen refacing color trends for current finish and hardware pairings that work well with popular veneer choices.

What does DIY cabinet refacing cost in Canada?

Canadian costs vary by kitchen size, material choice, and whether you hire a pro or do the work yourself. The figures below reflect typical ranges for materials available through Canadian home improvement retailers and custom door suppliers.

Refacing saves roughly 30%–50% compared to full cabinet replacement, which on a full Canadian kitchen replacement budget of $15,000–$30,000 CAD represents a meaningful saving.

The biggest cost variables are door style and veneer choice. Thermofoil and MDF doors are generally the most affordable; solid wood doors in custom profiles cost more. Custom sizing, hinge boring, and specialty finishes add to the per-door price but reduce installation time and the risk of measurement errors.

For a detailed breakdown of cabinet refacing costs vs. replacing, including savings tips specific to Canadian homeowners, that resource covers the numbers in depth.

Timeline expectations: A small kitchen takes most DIYers one long weekend for prep and a second weekend for installation. An average kitchen runs two to three weekends. Forbes notes that professionals finish faster because they work in teams and have specialized tools, but the DIY timeline is manageable if you plan each phase before you start.

What are the pros and cons of cabinet refacing?

Refacing is a strong choice for the right kitchen, and the wrong choice for the wrong one. Here’s an honest accounting of both sides.

Pros:

  • Costs 30%–50% less than full replacement, with significant additional savings when you DIY the labor
  • Far less disruptive than a full renovation: no demolition, no weeks without a functional kitchen
  • Wide finish palette, from thermofoil and painted MDF to real wood veneer and high-gloss lacquer
  • More eco-friendly than replacement, since reusing existing cabinet boxes avoids sending large wood components to landfill
  • Faster project timeline, especially with pre-made doors and pre-bored hinges

Cons:

  • Won’t change your kitchen layout or add storage, as The Spruce makes clear
  • Requires structurally sound boxes: particleboard that has begun to delaminate is a hard stop
  • Veneer can bubble, peel, or show seams if prep is inadequate or adhesive is applied incorrectly
  • Labor-intensive for DIYers, particularly the prep and measuring phases
  • Doesn’t address plumbing, electrical, or countertop issues

Red flags that point to replacement instead:

  • Cabinet boxes flex or feel soft when pressed
  • Particleboard is swollen, crumbling, or shows water damage
  • Drawer slides are built into the box sides and can’t be replaced without structural changes
  • You want to move a wall, add an island, or reconfigure the layout entirely

Pro Tip: If one or two cabinets have minor damage but the rest are solid, you can often repair those specific boxes with wood filler and epoxy rather than replacing the whole kitchen. Spot repair plus refacing is a legitimate middle path.

How do you fix common DIY refacing mistakes?

Even careful work produces occasional problems. Most are fixable without redoing the entire job.

Bubbling veneer: Press the bubble firmly with a veneer roller. If it doesn’t flatten, use a heat gun on low to soften the adhesive, press flat, and hold with a clamp and a flat board until cool. For PSA veneer, a clothes iron on low heat (with a cloth between iron and veneer) works the same way.

Edge lifting: Apply a thin bead of wood glue or contact cement under the lifted edge with a toothpick or syringe applicator. Press flat, wipe excess, and clamp for at least 30 minutes. Avoid this problem in the first place by pressing edges firmly with a roller immediately after application.

Visible seams: Sand the seam lightly with 220-grit, apply wood filler, sand flush, and touch up with paint or stain. If the seam is at a corner, re-trim with a sharp veneer trimmer and re-glue the edge.

Misaligned doors: Modern cup hinges adjust in three directions. Loosen the hinge screws slightly, move the door to the correct position, and retighten. If the door is more than 3mm out of alignment in any direction, check whether the mounting plate is positioned correctly on the face frame before adjusting the hinge arm.

The most common refacing mistake isn’t a technique error — it’s skipping the degreasing step. Grease-contaminated wood looks clean but repels adhesive at the molecular level. If your veneer is peeling within weeks of application, the cause is almost always inadequate surface prep, not the adhesive itself. Strip the failed section, degrease twice, sand, and reapply.

For a broader look at DIY cabinet refacing pitfalls and how to avoid them, that resource covers the most common errors in detail.

Measurement errors that cause door misalignment are also covered in this guide on avoiding common pitfalls in DIY door replacement.

What a door manufacturer wants you to know before you order

Getting custom doors right the first time comes down to the information you provide when you order. Manufacturers can cut to any size, but they can only work with what you give them.

Manufacturer checklist before you place an order:

  • Confirm your overlay value (1/2" or 1-1/4" per side) and apply it consistently to every door in the order
  • Record hinge bore preferences: 35mm cup diameter, distance from door edge (typically 3mm–5mm), and distance from top and bottom of door
  • Specify drawer front dimensions separately from door dimensions, and note the attachment method (screws from inside the drawer box)
  • Order at least one sample door in your chosen finish before committing to the full run
  • Request color swatches if you’re matching existing trim, flooring, or appliances

On tolerances: quality custom door suppliers cut to very tight tolerances, with Tdm-thedoormaker offering sizing precision to 1/10,000". That level of accuracy means a door ordered at 14-3/4" wide arrives at exactly that dimension, which matters when you’re working with older cabinets where openings vary by 1/8" or more.

Lead times vary by supplier and finish. Standard painted MDF doors typically ship faster than solid wood or specialty finishes. If your project has a hard deadline (a family event, a home sale), order doors before you start the prep work, not after. Most custom door orders take one to three weeks, and having the doors on hand before you start means you can verify fit before the frames are veneered.

Pro Tip: Order one or two extra drawer fronts if your kitchen has more than six drawers. Drawer fronts are the most likely component to get scratched during installation, and having a spare on hand avoids a second order with a separate lead time.

Tdm-thedoormaker’s online configurator walks you through how to reface cabinets yourself step by step, with measurement guidance built into the ordering process.

Why sample doors matter more than you think

A sample door lets you verify three things before the full order: the finish color under your kitchen’s lighting, the edge profile at actual scale, and the door weight (which affects hinge selection). Color swatches are useful for narrowing choices, but a full-size sample door is the only reliable way to confirm a finish before committing to 20 or more doors. The cost of a sample door is almost always less than the cost of returning and reordering a full set.

My honest take on DIY cabinet refacing

When the effort is worth it, and when it isn’t

DIY cabinet refacing rewards patience more than skill. The techniques are learnable by any homeowner who has hung a shelf or assembled flat-pack furniture. What separates a good result from a frustrating one is almost always the willingness to slow down during prep, measure twice, and not rush the adhesive cure time.

The projects that go wrong are usually the ones where someone skipped the degreasing step, measured once and ordered, or tried to hang all the doors in a single afternoon without checking alignment as they went. None of those mistakes are irreversible, but they add time and cost that erode the savings refacing was supposed to deliver.

My honest recommendation: if your cabinet boxes are solid and your layout works, DIY refacing is a genuinely good use of a few weekends. If you’re uncertain about your measuring accuracy or you have more than 25 doors, ordering a sample door and double-checking your overlay math before placing the full order will save you more money than any other single step in this process.

Custom doors that fit your project, sized to the millimeter

Tdm-thedoormaker takes the guesswork out of the ordering step. You get custom cabinet doors and drawer fronts sized to 1/10,000" precision, available in over 30 styles and 130+ colors and finishes, with pre-bored hinge holes added at checkout. The online configurator walks you through measuring, style selection, and order placement in three steps, and sample doors are available so you can confirm finish and fit before committing to a full run.

Tdm-thedoormaker

For Canadian homeowners doing their own refacing, that precision matters. Older kitchens with openings that vary by 1/8" need doors cut to exact dimensions, not rounded to the nearest standard size. Tdm-thedoormaker’s direct-to-consumer model also means pricing that typically undercuts larger retailers, with no middleman markup on custom sizing.

Order custom cabinet doors online and request a sample door to see the finish in your kitchen before you commit to the full order.

Sources

The following resources support the measurement, technique, and cost guidance in this cabinet refacing guide:

FROM THE SAME CATEGORY

Sep 8 2026 BY Ksenija Lebec, Blog

Landlords: inspect cabinets, run vacancy based ROI, budget $1,000–$13,000, and plan 1–3 day refacing installs with bulk order tips.

Build a Door MADE TO FIT YOU!

How to Match Cabinet Colors: A Practical Guide

How to Match Cabinet Colors: A Practical Guide

The fastest, most reliable path to accurate color matching for cabinets is this: remove a full door or large drawer front, bring it to a professional paint tinting lab for spectrophotometer scanning, and request sprayed test panels in your intended sheen. If your cabinets have a transparent stain, heavy grain, or sun-faded finish, a pigment match will likely fall short — ordering a sample door from a refacing vendor like Tdm-thedoormaker gives you a guaranteed, uniform result to compare instead.

Both paths are worth understanding. The sections below walk you through the full workflow, the technology behind paint shop matching, and the practical decision points that determine which route is right for your kitchen.


Key Takeaways

Accurate cabinet color matching requires sprayed test panels tested in your kitchen across multiple lighting conditions, not chips or brush samples.

Point Details
Use sprayed panels, not chips Request 6"–8" sprayed MDF panels from your paint shop; brush samples and chips don’t show true color or sheen.
Test across three time windows Check panels at 8 AM, 12 PM, and 8 PM to catch how light temperature shifts the perceived color.
Spectrophotometer limits matter Transparent stains, figured grain, and sun-faded finishes resist accurate pigment matching; plan for refinishing or replacement.
Prioritize backsplash and countertop Pull your cabinet undertone from the countertop’s mineral flecks and let the backsplash set the overall color direction.
Tdm-thedoormaker for guaranteed results When a paint match is unlikely to succeed, order a sample door from Tdm-thedoormaker to confirm color and finish before a full refacing order.

Table of Contents

How color matching cabinets works: a 3-step workflow you can start today

You don’t need to guess or wait for a contractor. Here’s a compact process you can begin immediately.

  1. Remove a full door or large drawer front. A sample the size of your palm won’t give a paint shop enough surface area to read accurately. If removing a door isn’t practical, order a sample door from a refacing vendor to use as a comparison reference. Note the finish type: solid paint, lacquer, stained veneer, or thermofoil. That detail determines what the shop can realistically reproduce.

  2. Bring the sample to a professional paint shop and request sprayed test panels. Ask the technician to scan the door with a spectrophotometer and produce sprayed panels in your intended sheen (satin or semi-gloss), not brush-applied chips. Brush samples look different from sprayed finishes even when the formula is identical. If your finish is a transparent stain or a varnished veneer, tell the technician upfront — the limits of spectrophotometer matching matter here, and the shop should advise you accordingly.

  3. Test the returned panels in three locations and at three times of day. Place them next to upper cabinets, lower cabinets, and your island (if you have one). Check at 8 AM, 12 PM, and 8 PM. Note how the color shifts under morning sun, midday overhead light, and evening artificial light. Track the Light Reflectance Value (LRV) of your match against the existing cabinets — a difference of more than a few LRV points will be visible in direct light.

Pro Tip: Photograph each swatch next to a sheet of pure white paper and a neutral gray card. The white paper forces any warm or cool undertone to reveal itself. A panel that looks perfectly neutral in isolation often shows a green or pink cast against true white.


How paint stores and spectrophotometers actually match your cabinet color

A spectrophotometer measures the spectral reflectance of a surface across the visible light spectrum, then generates a pigment formula that a tinting machine can reproduce. For solid, opaque cabinet paint, this process is genuinely accurate. The device reads the mass color of the surface and produces a formula your paint shop can mix on the spot.

The limits appear quickly, though. Spectrophotometer matches are powerful for pigment-based paints but often produce inaccurate results on transparent or variegated stained wood because the device reads surface reflections rather than the depth of stain penetration. If your cabinets are a medium-brown stained oak with visible grain, the scanner reads the average color of the surface, not the layered interaction between wood fiber, stain, and topcoat. The resulting formula will produce a flat, opaque paint that looks like the right color from across the room and wrong up close.

Close-up wood grain cabinet paint test swatches

Sun-faded panels create a different problem. A door that has been bleached by years of direct sunlight will read differently from a door inside a closed cabinet. Matching the faded door produces a formula that won’t match the protected doors — and matching the protected doors leaves the faded one visibly off. Sheen compounds the issue further: a semi-gloss formula applied with a brush reads differently from the same formula sprayed, because brush marks scatter light and reduce apparent sheen.

Pro Tip: When you request test panels, specify the exact sheen you’ll use on the final cabinets — satin, semi-gloss, or eggshell. A panel sprayed in satin and a panel sprayed in semi-gloss from the same formula will look like two different colors under kitchen lighting.


How to test matched swatches correctly in your kitchen

Small paint chips rarely reveal undertones accurately; designers recommend sprayed test panels or large-format samples to evaluate color in place. Request sprayed 6"–8" panels on primed MDF boards from your paint shop, or use pre-sprayed sample doors from your refacing vendor. The larger the sample, the more accurately you’ll read the undertone and sheen.

Once you have your panels, follow this sequence:

  1. Attach panels directly next to your upper cabinets, lower cabinets, and island. Don’t test them on a wall or countertop — the surrounding surfaces change how the color reads.
  2. Check the panels at 8 AM, 12 PM, and 8 PM. Professional painters stress that the same paint reads differently under varying lighting, and morning sun coming through an east-facing window can make a warm white look golden while the same paint looks clean and cool under overhead LEDs at noon.
  3. View the panels under every artificial light source you use daily: recessed LEDs, under-cabinet strips, and pendant lights. Warm-white bulbs (2700K) amplify yellow and beige undertones; cool-white bulbs (4000K–5000K) push colors toward gray and blue.

Photograph the swatches next to your backsplash tile and on top of a sheet of white paper. The backsplash photo shows whether the undertones harmonize with your tile grout and glaze. The white-paper photo reveals any hidden cast in the panel color that you’d otherwise miss until the paint is already on the doors.

Document your window orientation and bulb color temperature before making a final decision. A kitchen with south-facing windows and warm 2700K pendants behaves very differently from a north-facing kitchen with cool 4000K recessed lights, even with the same paint formula on the doors.

Test panels showing cabinet color under varied lighting


Practical prep and finish tips for a professional cabinet result

Surface preparation determines whether a matched color holds up or starts peeling within a year. Clean every cabinet surface with a degreaser — TSP substitute or a dedicated cabinet cleaner works well — then sand lightly with 150-grit to give the primer something to grip. Skip this step and even the best-matched paint will lift at the edges within months.

Hands cleaning and sanding cabinet door surface

Primer selection depends on your existing finish. For previously painted cabinets in good condition, a waterborne alkyd primer bonds well and dries fast. For glossy lacquer or thermofoil surfaces, a shellac-based primer like Zinsser BIN creates the adhesion that latex primers can’t achieve on their own. Stained or bare wood benefits from an oil-based or shellac primer to seal tannins and prevent bleed-through that would shift your matched color.

For topcoats, practical painting tips from experienced renovators consistently point to quality primer, light sanding between coats, and spraying where possible for an even, durable finish. Waterborne alkyds (Benjamin Moore Advance, Sherwin-Williams Emerald Urethane) level well and cure to a hard, washable surface. Sheen-wise, soft satin (30–40 sheen) reads cleanest on flat-panel doors; semi-gloss (50–60 sheen) suits raised-panel profiles and high-traffic kitchens where wipe-down durability matters more than subtlety.

Pro Tip: Before committing to the full cabinet run, paint the interior face of a removable drawer front or a hidden door panel as your final acceptance test. If the color, sheen, and texture look right there, proceed. If something is off, you’ve lost one panel, not an entire kitchen.


Why some finishes resist color matching — and what to do about it

Some cabinet finishes simply can’t be reproduced with a pigment-based paint match, no matter how good the spectrophotometer reading is. Recognizing these situations early saves you from a costly repaint that still looks wrong.

Situations where pigment matching typically falls short:

  • Transparent or semi-transparent stains: The color comes from the interaction between stain and wood grain. A solid paint formula can approximate the average tone but loses the depth and variation that make stained wood look natural.
  • Heavy grain variation: Figured oak, hickory, and knotty pine have such strong grain contrast that any solid color reads flat against them.
  • Sun-bleached panels: Faded doors have a different base color than protected doors in the same run, making a single formula unable to match both.
  • Multi-layer varnish or lacquer: The sheen and depth of a built-up lacquer finish can’t be replicated with a single coat of matched paint.

When the color difference comes from transparency or depth rather than surface pigment, you have three practical options. Full spray refinishing by a professional, using color-correcting toners and a compatible topcoat, can restore a stained finish if the wood is in good condition. Replacing or refacing the doors with custom cabinet doors gives you a guaranteed, uniform color across every door in the run. A two-tone strategy — accepting that upper and lower cabinets will differ and leaning into the contrast deliberately — is a third path that many designers now recommend when fixed elements make a single-color match impractical.

For guidance on refacing materials and finishes that hold color consistently over time, the material choice matters as much as the color formula.


How your kitchen’s fixed elements should guide your color choices

The backsplash often dictates cabinet color more than any other element, because it’s vertical, visually prominent, and usually the most complex surface in the kitchen. Start there, then work outward.

A practical priority order for choosing cabinet colors that harmonize with your kitchen:

  1. Backsplash — the dominant vertical surface that sets the undertone range
  2. Countertop — the horizontal surface you see most; pulling a cabinet color from the mineral flecks in your countertop avoids undertone clashes that make stone look dingy
  3. Flooring — warm wood floors push you toward warm cabinet undertones; cool gray tile gives you more flexibility
  4. Appliances and hardware — stainless reads cooler; brass and bronze read warmer
  5. Personal preference — color you genuinely want to live with daily

LRV (Light Reflectance Value) gives you a measurable way to control contrast. Aim for roughly 20 LRV points of difference between your cabinet color and your walls when you want a clear but not jarring contrast. Lighter cabinets (LRV 70+) open up smaller kitchens visually; darker cabinets (LRV below 30) add weight and drama but require good lighting to avoid a closed-in feel.

When fixed elements mix warm and cool undertones, designers often recommend a bridge greige or a two-tone approach — for example, a warm-white perimeter paired with a slightly cooler island — to prevent one surface from making another look dingy. That proportion means your cabinet color sets the entire kitchen’s temperature, so undertone accuracy matters more than the specific color name.

Pro Tip: Hold a sheet of white paper against your countertop in natural light. The countertop’s undertone will become immediately visible against the neutral white. If the stone reads warm (beige, gold, pink), choose a cabinet paint with a warm undertone. If it reads cool (gray, blue, green), stay on the cool side of the palette.

For current color directions worth considering, the National Kitchen & Bath Association (NKBA) publishes annual trend data that reflects what professional designers are specifying across North American kitchens.


Common mistakes DIYers make when matching and painting cabinets

Most color-matching problems are preventable. The errors below account for the majority of repaints and touch-up calls.

  • Choosing from a photo or a tiny chip. Screen colors are calibrated to the monitor, not your kitchen. A 1"×2" chip can’t show you undertone or sheen at cabinet scale.
  • Ignoring sheen differences. A satin formula looks noticeably different from a semi-gloss formula even when the color is identical. Always match sheen, not just color.
  • Accepting a brush-applied sample as proof. Brush marks change how light hits the surface. A sprayed panel is the only valid proof of what the formula will look like on your doors.
  • Trusting a color number without a sprayed test. Paint color codes are formulas, not guarantees. The same code mixed at two different shops can produce slightly different results depending on the tinting machine and pigment batch.
  • Testing only once, in one location. A color that looks right at noon under overhead lights can look completely different at 8 PM under warm pendants. Test across all three time windows before approving.
  • Skipping the undertone check. Subtle differences between whites can cause backsplash or countertops to look yellow or dingy when the undertones conflict. The white-paper test takes 30 seconds and prevents this.

For oak or warm-wood kitchens specifically, avoiding pure whites in favor of warmer off-whites is a common professional recommendation — pure white against warm grain often reads stark and cold rather than clean.


When should you repaint, refinish, or replace your cabinet doors?

The right choice depends on four factors: the quality of match you need, the condition of your existing doors, your budget, and how much time you have.

Option Match accuracy Typical turnaround Best for
DIY repaint Moderate 2–5 days Sound doors, solid paint finish, budget-conscious
Pro spray refinish High (solid colors) 3 days Good-condition doors, solid or lacquer finish
Custom replacement/refacing Guaranteed uniform 1–3 weeks (order + install) Stained/varnished doors, worn surfaces, or when exact match is impractical

Comparison diagram of repaint, refinish, and replacement options

Repainting makes sense when your doors are structurally sound, the existing finish is a solid paint or lacquer, and the color difference is small enough that a spectrophotometer match will get you close. Professional spray refinishing raises the accuracy ceiling for solid colors but still can’t reproduce transparent stain depth.

Replacement or refacing becomes the more cost-effective path when you’ve already done two or more touch-up rounds, when the doors show physical wear (delamination, swelling, deep scratches), or when the original finish is a stain or veneer that no pigment formula can replicate. At that point, repeated refinishing costs often exceed the price of a full door replacement, and the result is still a compromise. A comparison of cabinet refacing versus a full remodel shows that refacing typically delivers the visual result of new cabinetry at a fraction of the cost.


What installers and refacing pros want you to know

The gap between a color match that looks right in the paint shop and one that holds up in a real kitchen comes down to three things installers see repeatedly: sprayed panels, consistent sheen across every door in the run, and controlled conditions during application.

Temperature and humidity affect how paint levels and cures. That texture difference changes how the color reads under light, even when the formula is correct.

The most practical advice from experienced installers: when you’re uncertain about a match, test a single removable drawer front before touching the rest of the kitchen. A drawer front is easy to remove, easy to repaint if the result is wrong, and gives you a full-size, in-context proof of the finished look. If you’re considering replacement doors, order one sample door first and hold it against your existing cabinetry in your kitchen, under your lights, at different times of day. That single test eliminates most of the uncertainty before you commit to a full order.


Tdm-thedoormaker: a guaranteed uniform finish without the guesswork

When spectrophotometer matching isn’t going to reproduce your stain depth or grain variation, Tdm-thedoormaker offers a direct path to a uniform, professional finish. Instead of approximating an existing color, you choose from 130+ colors and finishes, order a sample door or swatch set, and compare it directly against your existing cabinetry in your own kitchen before placing a full order.

Tdm-thedoormaker

The ordering process runs through an online configurator: measure your existing doors, select your style and finish, and place the order with sizing precise to 1/10,000". Sample doors are available so you can confirm color, sheen, and texture in your actual kitchen before committing. For kitchens where the original finish is a stain, veneer, or aged lacquer that no paint shop can reliably reproduce, this approach removes the uncertainty entirely. You can also browse the full cabinet color archive to narrow your selection before ordering a physical sample.

To get started, order a sample door or swatch set and test it in your kitchen before committing to a full project.


Sources

The following sources informed this guide and offer deeper technical or design guidance for specific aspects of cabinet color matching and finishing.

Design guidance:

Technical and method guidance:

FROM THE SAME CATEGORY

Sep 8 2026 BY Ksenija Lebec, Blog

Landlords: inspect cabinets, run vacancy based ROI, budget $1,000–$13,000, and plan 1–3 day refacing installs with bulk order tips.

Build a Door MADE TO FIT YOU!

Custom Door Lead Times: What Canadian Buyers Need to Know

Custom Door Lead Times: What Canadian Buyers Need to Know

Most custom cabinet doors and drawer fronts for refacing projects ship within 4–8 weeks for standard finished orders, or as few as 1–3 weeks for raw, unfinished doors. Highly detailed finishes or complex profiles can push that to 8+ weeks. The biggest single causes of longer waits are finishing and curing time, design complexity, and holiday shop shutdowns.

Three things you can do right now to protect your schedule:

  • Confirm your measurements and approve your design as quickly as possible — orders don’t enter production until both are finalized and payment clears.
  • Choose a standard finish or substrate rather than a custom color match; it’s one of the most reliable ways to stay in the shorter range.
  • Request a written production schedule from your supplier before you place the order.

Key Takeaways

Finishing time is the single biggest driver of custom cabinet door lead times — choosing a standard finish is the most reliable way to stay within the shorter range.

Point Details
Realistic lead-time range Standard finished custom doors typically take 4–8 weeks; raw/unfinished doors often ship in 1–3 weeks.
Finishing drives the timeline Paint and coating curing adds weeks that fabrication alone does not; ask your supplier to separate these windows.
Order samples early Request color swatches and sample doors before final signoff to avoid rework and remakes.
Get a written production schedule Verbal estimates are a red flag; a written schedule with an estimated ship date is the minimum standard.
Tdm-thedoormaker reduces uncertainty The online configurator and instant checkout eliminate confirmation delays and secure your production slot faster.

Table of Contents

What custom door lead times actually look like in Canada

Understanding the realistic range for your order type is the foundation of any renovation schedule. According to Quay Construction, stock cabinets often arrive in 0–2 weeks, semi-custom in 4–8 weeks, and fully custom orders typically 8–16+ weeks, with local manufacturing capacity and project complexity determining where in that range your order lands.

Order type Typical range Key driver
Stock / pre-made 0–2 weeks Off-the-shelf inventory
Semi-custom (standard sizes, limited finishes) 4–8 weeks Production queue + standard finishing
Custom unfinished / raw 1–3 weeks Cutting and machining only
Custom finished (paint, stain, thermofoil) 4–8 weeks Finishing coats + curing
Highly custom (complex profiles, rare substrates, color-matched finishes) 8–16+ weeks Hand-finishing, tooling, sourcing

Chart of custom door order types and lead times

For refacing projects specifically, most Canadian homeowners are ordering finished, custom-sized doors and drawer fronts, which puts the realistic window at 4–8 weeks under normal conditions. KitchensByRemote notes that semi-custom lead times commonly run 6–12 weeks and custom 10–16+ weeks, and advises building your project schedule around cabinet delivery rather than the other way around.

A few factors that push Canadian orders toward the upper end:

  • Regional manufacturing capacity varies; smaller shops in less-populated provinces may have longer queues.
  • Finished doors require multiple coats with drying windows between each, adding weeks that raw doors skip entirely.
  • Raw cabinet doors typically ship within about 7–15 working days, while finished orders carry multi-week finishing windows on top of that.

Why some orders take much longer than others

Finishing is the primary bottleneck in most custom cabinet door production schedules. Paint, stain, and protective coatings each require specific drying and curing windows between coats, and a custom color-match request adds another layer of complexity on top of that. A door that takes two days to cut and machine can spend three to four weeks in the finishing stage alone.

Design complexity is the second major driver. Wide rails, specialty edge profiles, multi-piece raised-panel doors, inset construction, and glass inserts all require additional tooling setup and, in many cases, hand-finishing work that automation can’t fully replace. Advanced automation can make some custom orders nearly as quick as semi-custom ones, but the real time cost sits in hand-finishing and complex tool changes.

Material availability matters too. Common substrates like MDF and standard plywood move quickly. Rare veneers, specialty laminates, or unusual core materials may need to be sourced before production can even begin.

Queue time is often the most misunderstood factor. Orders enter active production only after design confirmation, deposit payment, and material availability are all confirmed. Many buyers assume production starts the moment they pay, but the clock doesn’t actually start until all three conditions are met.

Seasonal shutdowns add hidden risk. Missing an ordering window in November can delay shipments into the new year, since many Canadian shops pause production for 2–4 weeks around Christmas for maintenance and scheduled downtime.

Pro Tip: The custom features that carry the biggest time premium are hand-applied finishes and multi-piece door profiles. If your timeline is tight, a flat-center or simple Shaker profile in a standard painted finish will almost always ship faster than a raised-panel door with a custom stain.

Why some orders take much longer than others — overview diagram

What happens between your order and your installation day

Knowing which steps are sequential and which can overlap helps you plan other trades around your cabinet delivery.

  1. Measurement and confirmation (0–3 days): You finalize dimensions and submit them for review. Errors here cause the most expensive delays later.
  2. Design approval and sample/finish signoff (2–7 days): The supplier confirms your style, finish, and sizing. If you haven’t ordered samples yet, this step stalls until you do.
  3. Deposit/payment and order confirmation (1–2 days): Payment clears and the order enters the production queue. This is the actual production start trigger, not the moment you submit the order.
  4. Queue time and material sourcing (1–5 days, can run in parallel with other prep): The shop schedules your job and confirms substrate availability.
  5. Cutting and fabrication (1–2 weeks): CNC cutting, machining, and assembly of door components.
  6. Finishing (1–4 weeks depending on finish type): Primer, base coats, color coats, and topcoat, each with required curing windows between applications.
  7. Quality control (1–3 days): Fit and finish inspection. Remakes are uncommon but do happen, and they add hidden days to the schedule.
  8. Packing and shipping (3–10 days): Freight transit within Canada varies by distance and carrier.
  9. On-site delivery and verification (1 day): Inspect every door and drawer front before scheduling your installer.
  10. Installation: Schedule only after on-site verification is complete.

Finishing is strictly sequential — each coat must cure before the next is applied. Sourcing and queue scheduling can overlap with your own prep work, so use that window to complete demo, electrical, and plumbing rough-ins.

Nine ways to shorten your wait without sacrificing quality

Getting your order through the shop faster is mostly about removing friction at every handoff point.

  • Choose standard finishes. Painted MDF in a catalog color ships faster than a custom color-matched stain on a rare veneer. Browsing standard cabinet color options early in your planning narrows your choices to finishes that move quickly.
  • Submit complete, accurate measurements immediately. Incomplete or corrected measurements push your order to the back of the queue. Use a supplier’s measurement guide and double-check before submitting.
  • Order samples and swatches before final signoff. Waiting until after you’ve placed the order to evaluate a finish color is one of the most common causes of rework. Ordering cabinet door sample colors early eliminates that risk.
  • Sign approvals and clear payment without delay. Proactive communication and cleared deposits are often the single fastest way to eliminate avoidable delays, because the production clock doesn’t start until both are done.
  • Consolidate your order. One larger order is easier for a shop to schedule than multiple small ones. Batch all your doors and drawer fronts into a single submission.
  • Ask about rush-order availability. Some suppliers offer expedited production for an additional fee, which can shorten delivery to a few working days for eligible styles. Availability depends on the production schedule and door type.
  • Prefer local manufacturing. A Canadian-made door avoids cross-border shipping delays and customs clearance windows that can add unpredictable days to an otherwise tight schedule.
  • Schedule installers after delivery, not before. Booking your installer for a date before your doors arrive is the most common cause of costly rescheduling.
  • Batch across jobs if you’re a contractor. Placing a larger consolidated order across multiple projects can improve your priority in a supplier’s production queue.

Pro Tip: Online order flows that accept payment immediately and generate an instant order confirmation can save 1–2 working days compared to suppliers who require manual invoicing and bank transfer confirmation before entering your job into the queue.

When to place your order relative to your renovation timeline

Suppliers recommend ordering standard custom sizes 4–6 weeks ahead and allowing 6–8+ weeks for finished or highly customized doors. For a refacing project, that means your door order should go in before demo begins, not after.

Minimum ordering windows by complexity:

  1. Simple unfinished doors: 2–3 weeks before installation day.
  2. Standard finished doors (painted or thermofoil): 4–6 weeks minimum.
  3. Complex custom finishes or specialty profiles: 7–8+ weeks.

For contractors, building the project schedule around cabinet lead time rather than fitting doors into a pre-existing schedule is the clearest way to avoid installer idle time.

Seasonal dos and don’ts:

  • Place fall and winter orders by early November to clear the Christmas shutdown window.
  • Do not assume a supplier’s stated lead time accounts for holiday pauses — ask explicitly.
  • Do schedule demo and rough-in trades during the door production window; that time is not dead time.
  • Do not book flooring or countertop installation until doors are on-site and verified.
  • For DIY kitchen renovation planning, treat the door order date as the anchor for every other milestone.

Questions to ask suppliers and red flags to watch for

Before you commit to a supplier, these questions will tell you a lot about how reliably they’ll hit their stated window.

  • Do you provide a written production schedule with estimated ship dates?
  • Are sample doors and color swatches available before I finalize my order?
  • What triggers a remake, and how does that affect my delivery date?
  • What are your deposit and payment terms, and when does production actually start?
  • Do you schedule shipments or confirm delivery windows in advance?
  • Do you have seasonal shutdowns or planned capacity limits I should know about?

Red flags that predict delays: vague verbal-only estimates with no written confirmation; no sample or swatch policy; unclear deposit or refund terms; no documented QC process; refusal to commit to an estimated ship date even after payment clears.

Pro Tip: Ask your supplier directly: “What’s your contingency if my order misses its production slot?” A supplier with a clear answer has thought through their scheduling. One who deflects probably hasn’t.

How Tdm-thedoormaker’s process reduces lead-time uncertainty

Tdm-thedoormaker’s three-step process — measure, design, order — is built to eliminate the confirmation delays that push most custom door orders to the back of the queue. The online configurator walks you through sizing, style selection, and finish choice in a single session, and the checkout flow accepts payment immediately, so your order enters production without the 1–2 day lag that manual invoicing creates.

The trust signals you should expect from any serious supplier are all present here:

  • A written production schedule with your order confirmation.
  • Sample doors and color swatches available before you finalize.
  • Clear deposit and payment terms stated upfront, with no ambiguity about when production starts.
  • Documented QC and remake procedures so you know what happens if an issue is found.

Tdm-thedoormaker stocks common substrates and offers over 130 colors and finishes in standardized options, which keeps finishing windows predictable. Precision sizing to 1/10,000" means fit issues at installation are rare, reducing the likelihood of remakes.

Customers consistently report that the combination of an accurate online configurator and fast order confirmation made their refacing project easier to schedule than they expected — doors arrived on time and fit correctly the first time.

For a firm lead-time estimate on your specific door style and finish, configure and order your custom cabinet doors directly through the Tdm-thedoormaker online store.

The part of lead times most buyers underestimate

The finishing window is where most renovation schedules quietly fall apart, and it’s the part buyers consistently underestimate because it’s invisible. You place an order, you wait, and somewhere in that wait, three or four coats of paint are being applied and cured in sequence, each one adding days you never see on a calendar.

The practical implication: when a supplier quotes you a lead time, ask specifically how much of that window is finishing time versus fabrication time. A shop that can articulate that breakdown has a real production schedule. One that gives you a single number without explanation probably doesn’t.

The other underestimated factor is on-site verification. Scheduling your installer before your doors arrive is a bet that everything went perfectly, from the first coat of primer to the last kilometer of freight. Most of the time it does. But when it doesn’t, the cost of rescheduling a trade is almost always higher than the cost of a few extra days of patience.

Get a faster, predictable lead time with Tdm-thedoormaker

The quickest path to an accurate lead-time estimate is also the simplest: use Tdm-thedoormaker’s online configurator to select your door style, choose from the standard finish library, and complete checkout in one session. Standard finishes and common substrates ship faster than custom color-matched orders, and the instant order confirmation means your production slot is secured without the back-and-forth that delays most custom door orders by days.

Tdm-thedoormaker

Order replacement cabinet drawer fronts or full door sets through the Tdm-thedoormaker store, or configure your custom cabinet doors online to get a firm lead-time quote for your specific style and finish today.

Sources

FROM THE SAME CATEGORY

Sep 8 2026 BY Ksenija Lebec, Blog

Landlords: inspect cabinets, run vacancy based ROI, budget $1,000–$13,000, and plan 1–3 day refacing installs with bulk order tips.

Build a Door MADE TO FIT YOU!

Small Kitchen Refacing: Your Complete Canadian Guide

Small Kitchen Refacing: Your Complete Canadian Guide

Cabinet refacing is the right move for a small kitchen when your cabinet boxes are structurally sound and your layout works. You get a fresh, cohesive look in a fraction of the time and cost of a full replacement, with refacing typically running 30–50% less than new cabinets and completing in 3–5 days for a standard kitchen. Before you commit, do one thing: press firmly on every cabinet box panel and shelf. If anything feels soft, spongy, or bowed, stop and read the caveats section first.

Quick-reference checklist:

  • Cabinet boxes are firm, square, and dry? Refacing is likely your best path.
  • Layout works for how you cook? No need to move appliances or walls.
  • Budget in the $4,000–$15,000 CAD range? That covers most small-kitchen refacing projects.
  • Timeline: most small kitchens are done in 2–4 days with minimal disruption to your home.
  • Next step: order a sample door in your chosen finish before placing a full order.

Key Takeaways

Point Details
When refacing works Boxes are firm and dry, layout is functional, and budget is $4,000–$15,000 CAD.
Design choices that open space Flat or shallow-profile doors, light finishes, and low-contrast hardware reduce visual clutter and make small kitchens feel larger.
Cost and timeline Most small-kitchen refacing projects in Canada land between $5,000 and $9,000 CAD and complete in 2–5 days.
Inspect before you commit Press on every cabinet panel and shelf before ordering; soft or bowed boxes disqualify a kitchen from refacing.
Tdm-thedoormaker Offers precision-cut custom doors in 30+ styles and 130+ finishes with sample availability, ordered online in three steps.

Table of Contents

Why does small kitchen refacing deliver such high visual impact?

In a compact kitchen, every surface you see is a cabinet. There is no sprawling island or long stretch of countertop to draw the eye away. That concentration of cabinetry means a refacing job, which replaces doors, drawer fronts, and veneers the exposed cabinet faces without touching the layout, changes the entire character of the room in one move.

Designers consistently point to design cohesion as one of the most powerful tools in a small kitchen: when cabinet finishes, walls, and backsplash share a close tonal relationship, the eye reads the room as one unified space rather than a series of competing surfaces. That reduction in visual contrast makes the kitchen feel noticeably larger without moving a single wall. Refacing is the most direct way to achieve that cohesion because it lets you control every visible cabinet surface at once.

The practical case is just as strong. You can explore the reasons to reface your cabinet doors in detail, but the short version is this: no demolition, no new plumbing or electrical, no weeks of a gutted kitchen. For a household that depends on that kitchen daily, that matters.

Factor Refacing Full replacement
Typical cost (CAD) $4,000–$15,000 $4,000–$15,000
Timeline 2–5 days 3–6 weeks
Layout change No Yes
Disruption level Low High
Best when Boxes are sound, layout works Boxes damaged or layout must change

Refacing typically costs 30–50% less than full cabinet replacement and is completed in days, not weeks, making it one of the most cost-efficient upgrades available for a small kitchen.


Which door styles make a small kitchen feel larger?

The door profile you choose does real work in a tight space. Flat-panel or slab doors are the strongest choice for visual simplicity: no raised edges, no shadow lines, nothing to fragment the surface. A run of slab doors in a soft white or warm greige reads as one continuous plane, which is exactly what you want. Shallow-profile shaker doors are a close second. The recessed center panel adds just enough definition to feel intentional without the visual weight of a traditional raised-panel style.

Flat white slab cabinet doors in small kitchen

Glass inserts, used selectively on one or two upper cabinets, create depth by letting the eye travel past the door surface. They work especially well when the interior is lit or kept tidy. Avoid covering every upper cabinet in glass; the effect reverses when the inside looks cluttered.

For finishes, lighter tones and satin sheens are the most reliable performers in small kitchens. High-gloss surfaces reflect light and can increase perceived depth, but they also show every fingerprint and surface imperfection, which is worth factoring in if your kitchen gets heavy daily use. A two-tone approach, where lower cabinets carry a slightly deeper tone and uppers stay light, draws the eye upward and makes ceilings feel higher.

Material options and their fit for small kitchens:

  • Painted MDF doors: Consistent color, no grain variation, takes paint well, and holds up in moderate humidity. A practical choice for most Canadian kitchens.
  • Thermofoil: A PVC film heat-pressed over MDF. Smooth, easy to clean, and available in a wide color range. Can lift at edges near heat sources over time, so placement near the range matters.
  • Wood veneer: Real wood character with less movement than solid wood. Works well in kitchens with controlled humidity. Requires periodic maintenance.
  • Laminate: Durable, moisture-resistant, and available in many finishes including wood-look options. A strong choice for high-traffic small kitchens.

Pro Tip: Order a physical sample door in your top two finish choices and live with them in your kitchen for 48 hours before placing your full order. Kitchen lighting, especially the mix of natural and under-cabinet light, changes how a finish reads dramatically from morning to evening.


How do hardware and lighting help a small kitchen read larger?

Hardware scale is easy to get wrong in a small kitchen. Oversized pulls on narrow cabinet doors look heavy and draw attention to how little space there is. For doors under 18 inches wide, a 96mm (roughly 3.75-inch) bar pull or a small round knob keeps proportions clean. On drawer fronts, a single centered pull works better than two knobs, which can make a standard drawer look busier than it is.

Close-up of small kitchen cabinet hardware scale

Finish coordination between hardware and cabinets reduces visual clutter more than most homeowners expect. When the hardware finish sits close to the cabinet finish in tone (brushed nickel on a cool gray, matte black on a deep navy, warm brass on a creamy white), the hardware recedes slightly and the cabinet surface reads as one piece. High-contrast hardware, like polished chrome on a dark cabinet, pulls the eye to every individual door and fragments the run.

Lighting layers matter as much as any finish choice. Under-cabinet task lighting eliminates the shadow that standard overhead fixtures cast across the counter, which makes the work surface feel open rather than cramped. A warm-white LED strip (2700K–3000K) under upper cabinets, combined with a central overhead fixture, removes the flat, shadowy quality that makes small kitchens feel smaller. If your budget allows one lighting upgrade alongside a refacing project, under-cabinet LED strips are the highest-return option.


What storage upgrades pair best with a small-kitchen refacing?

A refacing project is the ideal moment to address storage because the cabinet fronts are already coming off. These upgrades, ranked by impact per dollar spent, work with your existing boxes:

  1. Deep drawer conversion for lower cabinets. Replacing a lower cabinet’s fixed shelf and door with two or three deep drawers gives you full-depth access to everything inside. Pots, pans, and dry goods that disappear into the back of a shelf become visible and reachable. This is consistently the highest-impact storage upgrade in a small kitchen.
  2. Pull-out trays inside base cabinets. If full drawer conversion is outside the budget, retrofitted pull-out trays on full-extension slides achieve most of the same benefit. They fit inside existing boxes without structural changes.
  3. Vertical dividers for baking sheets and cutting boards. A simple set of vertical dividers in one base cabinet keeps flat items upright and accessible. The cost is low and the daily convenience is significant.
  4. Slim pantry pull-outs. A 6–9 inch pull-out pantry column beside the refrigerator or at the end of a cabinet run uses otherwise dead space for canned goods, spices, and small appliances.
  5. Tray dividers in upper cabinets. Upper cabinet tray dividers keep serving platters and sheet pans from stacking into an unstable pile that requires unpacking to reach the bottom item.

Small-kitchen makeovers show consistently that storage planning and opening sightlines deliver as much perceived-space improvement as any finish change. If you find that your storage problems are structural, such as boxes that are too shallow for standard pull-outs or a layout that puts the refrigerator where a pantry column needs to go, that is a signal that partial replacement may serve you better than refacing alone.


What materials are used in refacing, and what does the process look like?

The refacing process follows a predictable sequence regardless of which contractor or supplier you use. On day one, the installer removes all existing doors, drawer fronts, and hardware. They then apply a veneer or laminate sheet to every exposed cabinet face frame, matching the finish of the new doors. New doors and drawer fronts go on next, followed by hardware. A careful installer checks hinge alignment, drawer slide function, and veneer seam placement before calling the job complete.

Material Durability Moisture resistance Maintenance Best use case
Painted MDF Good Moderate Low Most kitchens, controlled humidity
Thermofoil Good High Very low High-traffic, easy-clean priority
Wood veneer Good Moderate Medium Character-focused kitchens
Laminate Excellent High Low High-humidity or heavy-use kitchens

In Canadian climates, moisture resistance is a practical concern, not just a spec-sheet detail. Kitchens near exterior walls in colder provinces see humidity swings between winter heating season and summer. Thermofoil and laminate handle those swings better than raw wood veneer, which can expand and contract slightly at the edges. Painted MDF performs well when the paint film is intact; chips or scratches that expose the MDF core can absorb moisture quickly, so touch-up maintenance matters.

Quality checkpoints to verify during the job: veneer seams should fall at inside corners, not on flat visible faces; hinge cups should be drilled cleanly with no tear-out; drawer fronts should align within 1/16 inch across a run; and the finish on new doors should match the color sample you approved before ordering.


What does small-kitchen refacing cost in Canada, and what moves the price?

Refacing typically ranges from roughly $4,000 to $15,000 depending on materials, door count, and region. For a small kitchen with 10–15 doors and 4–6 drawer fronts, a realistic mid-range budget in Canada sits between $5,000 and $9,000 CAD for professionally installed work with painted MDF or thermofoil doors. Premium wood veneer doors or complex custom profiles push toward the higher end.

A small kitchen refacing in Canada typically costs 30–50% less than a full cabinet replacement, with most projects landing between $5,000 and $9,000 CAD for mid-range materials and professional installation.

Primary cost drivers:

  • Door material: Painted MDF and thermofoil are the most affordable. Real wood veneer and premium laminates add cost per door.
  • Number of doors and drawer fronts: Each additional piece adds both material and labor cost. Count carefully before requesting quotes.
  • Veneer complexity: Kitchens with many exposed face frames, unusual angles, or curved sections require more veneer material and installation time.
  • Hardware: Basic pulls run $5–$15 CAD each; designer hardware can reach $50–$100 per piece. On a 20-piece kitchen, that spread matters.
  • Regional labor rates: Labor costs vary meaningfully between major urban centers (Toronto, Vancouver) and smaller markets. Travel fees apply in rural areas.

For homeowners with tighter budgets, documented projects show that selective DIY tactics combined with professional door replacement can bring total spend well under $5,000. Ordering custom doors directly and handling hardware installation yourself is a practical hybrid approach. You can find budget-focused refacing guidance that outlines which parts of the job are genuinely DIY-friendly and which are worth paying a professional to handle.

Quote checklist — ask for these line items in any written estimate:

  • Per-door and per-drawer-front pricing
  • Veneer material and coverage area
  • Hardware cost (supplied vs. owner-supplied)
  • Hinge drilling and soft-close upgrade pricing
  • Travel or delivery fees
  • Warranty terms on materials and labor

When should you NOT reface your small kitchen?

Refacing cannot fix a structural problem, and spending $6,000–$9,000 on new doors over damaged boxes is money poorly spent. These are the conditions that disqualify a kitchen from refacing:

Red-flag checklist:

  • Soft or spongy cabinet panels. Press firmly on the side panels, bottom, and shelves of every base cabinet. Softness means water damage or particleboard failure. New doors will not solve this.
  • Bowed shelves or warped face frames. A bowed shelf that cannot be corrected with a new slide or support bracket means the box itself has failed.
  • Misaligned or out-of-square frames. Doors hung on a twisted frame will never close cleanly, regardless of how well they are made.
  • Nonstandard cabinet depths. Cabinets that are shallower or deeper than standard (12 inches for uppers, 24 inches for bases) may require custom door sizing. This is manageable with a supplier who offers custom sizing, but worth confirming before ordering.
  • Appliances that require cabinet changes. If you want to move the refrigerator, add a dishwasher, or change the range size, those changes require cabinet work that goes beyond refacing.

A practical decision framework: check box condition, layout function, budget, and timeline. When three of those four factors favor refacing, refacing usually wins. When box condition fails, that single factor overrides the others.

Pro Tip: Before calling any contractor, do a 10-minute box inspection yourself. Open every cabinet, press on the panels, look for water stains at the base of sink cabinets, and check that doors close without binding. This one step tells you whether refacing is even on the table.


How do you choose materials and a supplier for your refacing project?

The supplier decision matters as much as the material choice, especially for a small kitchen where every door is visible and sizing precision affects how the finished job looks.

Material selection checklist:

  • Does the supplier offer physical samples in your chosen finish? Test them in your kitchen light before ordering.
  • What is the sizing tolerance? For a clean, professional result, doors should be cut to within 1/16 inch of your specified dimensions. Tdm-thedoormaker cuts to 1/10,000-inch precision.
  • Are hinge holes pre-drilled, and do they match your existing hinge cup size?
  • What is the warranty on the finish and the substrate?
  • What is the lead time, and does it fit your project schedule?

Questions to ask any vendor:

  • Can you supply a sample door in the exact finish and profile I’m ordering?
  • What is your return or replacement policy if a door arrives damaged?
  • Do you offer custom sizing for non-standard cabinet dimensions?
  • How do you handle color matching between doors and veneer for face frames?

Tdm-thedoormaker’s three-step process (measure, design, order) is built specifically for homeowners doing this without a contractor on site. Their cabinet refacing versus full remodel guide walks through the decision clearly, and their online configurator lets you spec every door to your exact measurements before placing an order. Sample doors are available, which is the single most important step before committing to a full run of custom doors. For small kitchens in Canada, that combination of custom sizing, sample availability, and direct-to-consumer pricing makes them a practical first call.

For pantry door selection alongside a refacing project, this guide on selecting the right pantry door covers the decision factors clearly. And if you are considering handling part of the installation yourself, this overview of common DIY door replacement pitfalls is worth reading before you start.

You can also browse contemporary cabinet door styles to narrow your profile choices before requesting samples.


A practical perspective on small-kitchen refacing

The homeowners who get the best results from refacing share one habit: they slow down at the beginning. They inspect their boxes carefully, order samples in two or three finishes, and test those samples in their actual kitchen light for a full day before deciding. The ones who skip those steps are the ones who end up with a finish that looked perfect on a monitor but reads slightly yellow under their kitchen’s warm LEDs.

The other thing worth saying plainly: small kitchens are unforgiving of mediocre execution. In a larger kitchen, one slightly misaligned door is easy to overlook. In a 10-cabinet kitchen, it is the first thing every visitor notices. That is not an argument against refacing. It is an argument for choosing a supplier who cuts to tight tolerances and offers samples, and for doing the box inspection before you spend a dollar.

The design choices that work repeatedly in small kitchens are not complicated: light or mid-tone finishes, flat or shallow-profile doors, hardware that sits close in tone to the cabinet, and under-cabinet lighting. None of those choices require a designer. They require a willingness to test before committing.


The Door Maker makes custom refacing straightforward for small kitchens

Custom sizing is where most small-kitchen refacing projects run into trouble. Standard stock doors rarely match the mix of widths and heights in an older Canadian kitchen, and the gap between a 14.5-inch door and a 15-inch stock door is visible every day. Tdm-thedoormaker solves that with precision-cut custom doors available in over 30 styles and 130+ colors and finishes, ordered entirely online with no contractor required.

Tdm-thedoormaker

The process is three steps: measure your existing doors, use their online configurator to design each door to your exact dimensions, and place your order. Sample doors are available before you commit to a full run, which is the step that separates a confident purchase from a guessing game. For Canadian homeowners working through a small kitchen makeover, that combination of custom sizing, sample availability, and direct pricing makes the process far more manageable than sourcing through a traditional cabinet shop.

Browse custom cabinet doors online to see available styles and start your measurement, or order a sample door first to test your chosen finish in your own kitchen light.


Sources

FROM THE SAME CATEGORY

Sep 8 2026 BY Ksenija Lebec, Blog

Landlords: inspect cabinets, run vacancy based ROI, budget $1,000–$13,000, and plan 1–3 day refacing installs with bulk order tips.

Build a Door MADE TO FIT YOU!

Cabinet Door Overlay: Measure, Choose, and Order Right

Cabinet Door Overlay: Measure, Choose, and Order Right

Cabinet door overlay is the distance a door extends over the cabinet opening or face frame when it’s closed. Get that number wrong and your replacement doors won’t fit, your hinges won’t align, and your refacing project stalls before it starts. The single most useful thing you can do right now is measure the hinge-side overlay using a piece of tape: place it at the back edge of the door, close the door, mark where the opening edge falls, open the door, and measure from the inside edge of the tape to that mark. Record that number to the nearest 1/16".

The five overlay families you’ll encounter in Canadian kitchens are:

  • Inset: Door sits flush inside the opening, with no overlap at all
  • Lipped/partial inset: Door has a small rabbet that lets it sit partially inside the frame
  • Partial (half) overlay: Door covers roughly half the face frame, leaving a visible reveal
  • Full overlay (Euro): Door covers nearly all of the face frame for a clean, modern look
  • Frameless/twin overlay: Used on frameless (European-style) boxes where doors meet at the center with a small gap

Each type pairs with a specific hinge category and produces a different finished door size, which is why knowing your overlay before you order custom doors is non-negotiable.


Key Takeaways

Overlay is the single measurement that determines door size, hinge type, and the finished look of your cabinetry, so measure it first and measure it accurately.

Point Details
Overlay defined Overlay is how far a cabinet door extends over the opening or face frame when closed.
Measure to 1/16" Use the tape method at the hinge side and record every cabinet individually to the nearest 1/16".
Common sizes Partial overlay is typically 1/2"; full overlay (Euro) is typically 1-1/4"; typical range is 3/8"–1-9/16".
Hinge must match overlay Confirm your hinge’s rated overlay range and boring distance before finalizing any door order.
Tdm-thedoormaker next step Enter your overlay and opening dimensions into Tdm-thedoormaker’s configurator to get doors cut to exact spec.

Table of Contents

What is cabinet door overlay, and which type do you have?

Cabinet door overlay describes how much of the cabinet face frame a door covers. The face frame is the flat border of wood around the cabinet box opening. Overlay determines what you see when the kitchen is at rest: whether the wood frame peeks through, disappears behind the doors, or whether the door sits flush inside the box entirely.

Inset

An inset door sits completely inside the face-frame opening, flush with the front surface. When you close an inset door, you see a consistent gap (the reveal) running around all four edges. This style reads as traditional or furniture-grade, and it demands the most precise fitting. Even a 1/16" discrepancy is visible. Inset cabinets are common in higher-end Canadian kitchens and period-style renovations, but they are the least forgiving for DIY refacing because the box and frame must be perfectly square.

Inset cabinet door flush fit

Lipped/partial inset

A lipped door has a small rabbet cut around its perimeter so it sits partially inside the opening while the lip rests on the face frame. You’ll find this style on older Canadian cabinetry from the 1960s through the 1980s. The visual cue is a slight step at the door edge rather than a clean flush surface or a flat overlay. Replacement doors in this style are less common today, which makes refacing a lipped cabinet a good reason to consider converting to partial or full overlay instead.

Partial (half) overlay

Partial overlay, sometimes called half overlay, is the most common configuration in Canadian tract homes and builder-grade kitchens. The door covers part of the face frame, typically leaving a 1" to 1-1/2" reveal between adjacent doors. You can see the face frame clearly when standing in front of the cabinets. This style works with a wide range of hinge types and is the most retrofit-friendly option when you’re refacing without touching the box structure.

Full overlay (Euro)

Full overlay covers most of the face frame, leaving only a small reveal (usually 1/8" or less) between adjacent doors. The result is a flat, uninterrupted wall of doors that reads as modern or contemporary. Full overlay is the standard for European-style frameless cabinets and is increasingly popular in Canadian kitchen renovations where homeowners want a sleek, handle-free aesthetic. It requires concealed cup hinges with a specific crank (offset) to achieve the correct door position.

Modern kitchen with full overlay cabinet doors

Frameless/twin overlay

On a frameless cabinet box, there is no face frame at all. Two adjacent doors share the same panel edge, and each door overlaps the box side by a set amount (commonly 5/8" to 3/4"). The gap between the two doors is typically 3/16" to 1/4". This configuration is standard in IKEA-style cabinetry and most European imports. Hinge selection here is critical because the mounting plate must account for the full overlay without a face frame to reference.

Pro Tip: To tell inset from overlay at a glance, run your fingertip along the door edge where it meets the frame. If you feel the door surface sitting proud of the frame, it’s overlay. If the door is recessed and your finger drops into a gap, it’s inset.

Overlay Type Face Frame Visible? Typical Reveal Best Style Match Retrofit Friendly?
Inset No 1/8"–3/16" gap all around Traditional, furniture-grade Low
Lipped/partial inset Partially Lip covers frame edge Vintage, 1960s–1980s Low
Partial (half) overlay Yes 1"–1-1/2" between doors Builder-grade, transitional High
Full overlay (Euro) Barely 1/8" or less Modern, contemporary Medium
Frameless/twin overlay No frame 3/16"–1/4" between doors European, minimalist Medium

Diagram comparing overlay cabinet types and features


How to measure your cabinet door overlay accurately

The tape method is the most reliable approach for homeowners, and it works whether your doors are still mounted or already removed. Measuring to the nearest 1/16" is the standard that custom door manufacturers expect.

Measuring with doors in place (tape method)

  1. Gather your tools. You need a tape measure, a pencil, and a small strip of painter’s tape.
  2. Place the tape. Open the door fully. Stick a strip of painter’s tape on the back face of the door, right at the hinge-side edge.
  3. Close the door. Gently close the door so it sits in its normal closed position.
  4. Mark the opening edge. With the door closed, use a pencil to mark on the tape exactly where the inside edge of the cabinet opening falls.
  5. Open the door. Open the door again and measure from the inside edge of the tape strip to your pencil mark. That distance is your hinge-side overlay.
  6. Repeat on the latch side. Do the same on the opposite edge. On a well-hung door, both sides should match. If they differ by more than 1/16", the door may be misaligned or the opening may not be square.
  7. Record both numbers. Write them down immediately. Don’t rely on memory when you’re measuring a full kitchen.

Measuring from a removed door

If the doors are already off, calculate overlay using the formula: subtract the opening width from the door width, then divide by two.

Overlay = (Door Width − Opening Width) ÷ 2

For example: a door that is 15" wide over a 13.5" opening gives you (15 − 13.5) ÷ 2 = 0.75", or 3/4" overlay on each side.

Single doors vs. split (double) doors

For a single door covering one opening, the formula above applies directly. For a pair of doors sharing one opening, you need to account for the center reveal (the gap between the two closed doors, typically 1/8"). The formula becomes:

Each door width = (Opening Width + (Overlay × 2) − Center Reveal) ÷ 2

So a 27" opening with 1/2" overlay on each side and a 1/8" center reveal gives: (27 + 1 − 0.125) ÷ 2 = 13.9375", which rounds to 13-15/16".

Special cases

Corner cabinets often have a blind section where one door partially hides behind an adjacent cabinet. Measure the visible portion of the opening separately from the blind section and note which side carries the overlay. Bi-fold doors and tall pantry doors follow the same overlay logic, but their height measurements require checking for floor-level clearance as well.

Pro Tip: Measure every cabinet individually, even if they look identical. Builder-grade kitchens frequently have openings that vary by 1/8" or more across a run of cabinets. Assuming uniformity is one of the most common and costly mistakes in a custom-door order.


Common overlay sizes and how they translate to door dimensions

Standard overlay values cluster around a handful of sizes that align with common hinge specifications. Knowing where your measurement falls helps you confirm you’re ordering the right door size and the right hinge.

Typical overlays in practice range from about 3/8" to 1-9/16", with 1/2" being the most common partial overlay and 1-1/4" the most common full overlay for concealed-hinge installations.

Calculating finished door size

Once you know your overlay, the finished door width formula is straightforward:

Single door width = Opening Width + (Overlay × 2)

For height, the same logic applies: add the overlay amount to the top and bottom of the opening. A 24" tall opening with 1/2" overlay top and bottom gives a door height of 25".

For split doors, subtract the center reveal before dividing:

Each door width = (Opening Width + (Overlay × 2) − Center Reveal) ÷ 2

The center reveal is almost always 1/8" (3 mm) for face-frame cabinets. Frameless cabinets use a slightly larger gap, typically 3/16".

Tolerances and ordering precision

Measure to the nearest 1/16" and do not round up or down to a “nicer” number. Custom door manufacturers cut to exact dimensions, so a door ordered at 13-7/8" will not fit a 14" opening with the same clearance as one ordered at 14". For inset doors specifically, you need a clearance gap of 1/16" on each side, meaning the door width should be the opening width minus 1/8" total. Overlay doors have no such clearance requirement on the overlay edges, but the top and bottom still need 1/16" clearance to swing freely.

European concealed hinges are specified in millimeters and typically cover overlays from 0 mm (inset) to 18 mm (full overlay), with 13 mm being the most common partial-overlay specification. Confirm the hinge’s rated overlay range before finalizing your door dimensions.


How overlay affects your hinge selection and hardware

Overlay and hinge type are inseparable decisions. Choosing one without confirming the other is the most common hardware mistake in a DIY refacing project, and the NKBA recommends planning hardware and clearance before finalizing any cabinet design.

The relationship works like this: the hinge’s mounting plate determines how far the door sits from the cabinet side, and the cup (the circular recess drilled into the back of the door) positions the pivot point. Change the overlay and you change both.

  • Partial overlay hinges are designed for overlays in the 3/8"–1/2" range. They use a standard crank mounting plate that positions the door close to the face frame. These are the most widely available hinges at Canadian hardware retailers.
  • Full overlay hinges use a zero-protrusion or low-profile mounting plate that pulls the door further from the cabinet side, allowing it to cover more of the face frame. The cup placement on the door back is the same 35 mm diameter, but the plate offset differs.
  • Inset hinges require the door to sit flush inside the opening. Concealed inset hinges use a negative-crank plate that pulls the door inward. Surface-mount inset hinges (butt hinges) are the traditional alternative and require a mortise cut into the door and frame.
  • Frameless/full overlay concealed hinges mount directly to the cabinet side panel with no face frame. The plate attaches to the panel itself, and the overlay is measured from the panel edge, not a frame.

Cup drilling is standardized at 35 mm diameter and typically placed 3 mm from the door edge, but the distance from the door edge to the cup center (the “boring distance”) varies by hinge model. Always confirm the boring distance from the hinge spec sheet before ordering doors with pre-drilled hinge holes. A door drilled for one hinge brand may not accept another brand’s cup without a visible gap or misalignment.
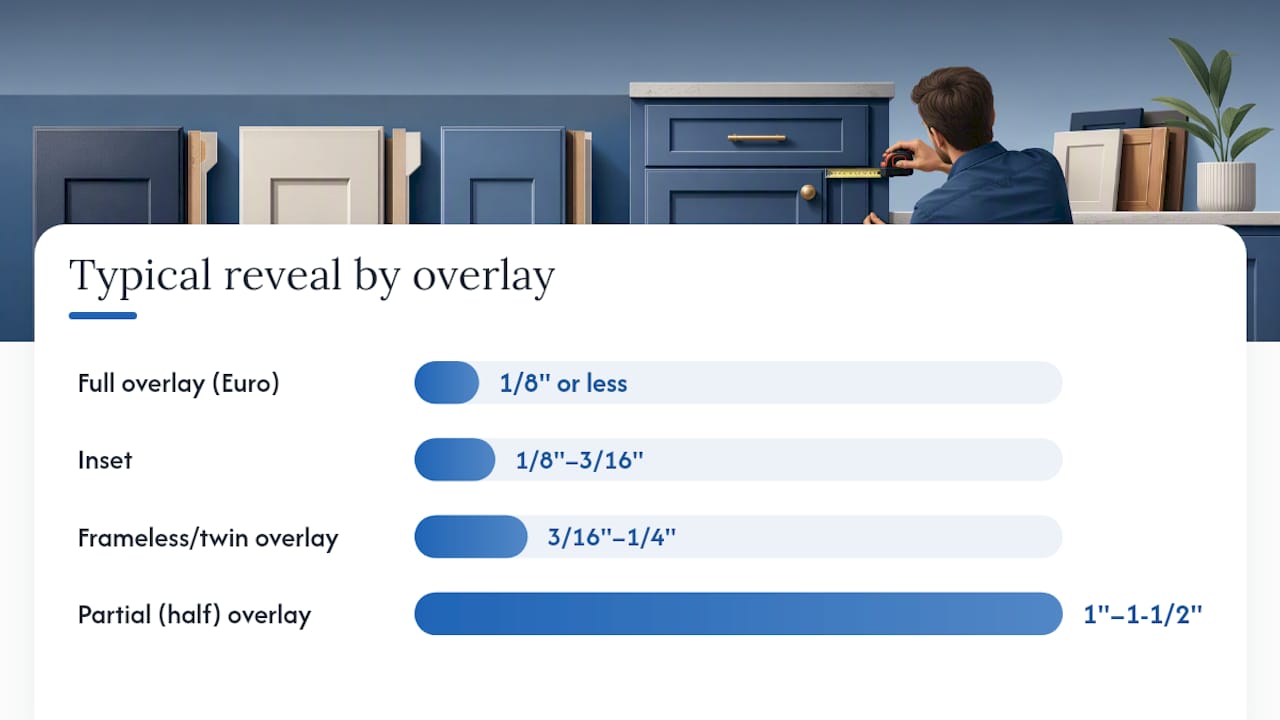
Mounting plate height (the vertical position of the hinge on the cabinet interior) affects door alignment but not overlay. Set the top hinge 2"–3" from the top of the door and the bottom hinge 2"–3" from the bottom as a starting point, then adjust for door weight and panel material.


How to choose the right overlay for your kitchen

The right overlay depends on three things: the look you want, the cabinet structure you’re working with, and how much installation complexity you’re willing to take on.

Aesthetic goals

Full overlay reads as modern and clean because the face frame nearly disappears. If you’re drawn to flat-front doors, handleless profiles, or a Scandinavian-influenced kitchen, full overlay is the natural match. You can explore contemporary door styles that pair well with this configuration before committing to an overlay size.

Partial overlay suits transitional and traditional kitchens where some face-frame visibility is part of the design. Inset is the choice for a furniture-grade, period-accurate look, but it demands the most precise installation and the most precise box construction.

Refacing vs. full replacement

Refacing and full replacement have different overlay constraints. When you reface, you keep the existing box and face frame, which means your overlay options are limited by the frame width. A face frame that’s only 3/4" wide can’t support a 1-1/4" full overlay without the door covering the adjacent cabinet’s frame. Measure your face frame width before deciding to upgrade from partial to full overlay during a reface.

Full replacement gives you complete freedom to choose any overlay because the box and frame are built to spec. The trade-off is cost: refacing typically costs significantly less than a full remodel, which is why most Canadian homeowners doing a budget-conscious update stick with their existing overlay type or make a modest upgrade from partial to full overlay.

Accessibility and clearance

In tight galley kitchens or kitchens with islands, door swing clearance matters. Full overlay doors are slightly wider than partial overlay doors for the same opening, which means they swing a bit further into the room. If you have a 36" aisle between the counter and an island, check that a full overlay door on a 24"-deep base cabinet doesn’t block the walkway when open.

Handle placement also shifts with overlay. On a partial overlay door, the handle sits closer to the face frame edge. On a full overlay door, the handle is further from the frame, which can feel more natural for taller users.

Are overlay cabinets out of style?

No. Partial overlay cabinets are the most common configuration in Canadian homes and remain a practical, cost-effective choice. Full overlay has grown in popularity as modern kitchen aesthetics have taken hold, and it’s now the default for new construction in many urban Canadian markets. Inset is experiencing a quiet revival in higher-end renovations. The honest answer is that overlay type follows function first: choose the one that fits your box, your budget, and your aesthetic, and it will look current.


Measurement checklist before you order custom doors

Run through this list before placing any custom door order. A missed measurement is far more expensive to fix after the doors arrive than before.

Measurements to collect:

  • Door width and height for every cabinet (measure each one individually)
  • Opening width and height for every cabinet
  • Hinge-side overlay (tape method, to nearest 1/16")
  • Latch-side overlay (should match hinge side; note any discrepancy)
  • Center reveal for all split-door pairs (typically 1/8")
  • Drawer front width and height (measured the same way as door overlay)
  • Face frame width (to confirm overlay feasibility)

Photos to take:

  • Full-face photo of each cabinet run with doors closed
  • Close-up of one hinge interior showing the cup, mounting plate, and any markings
  • Photo of the hinge spec label if visible

Common mistakes to avoid:

  • Measuring outside-to-outside of the door instead of the opening width
  • Ignoring the center reveal on split-door pairs (this makes each door too wide by 1/16")
  • Rounding to the nearest 1/4" instead of 1/16" (custom manufacturers cut to exact spec)
  • Assuming all cabinets in a run are identical without measuring each one
  • Ordering without confirming hinge type (the wrong hinge makes a correctly sized door hang wrong)

How Tdm-thedoormaker supports your overlay-based order

Tdm-thedoormaker’s ordering process is built around the same measurement steps covered in this article. The three-step workflow, measure, design, and order, maps directly to what you’ve just done: you have your overlay number, your opening dimensions, and your hinge type noted.

The online configurator at Tdm-thedoormaker walks you through entering your exact measurements, including overlay, opening size, and hinge-hole placement. Doors are cut to 1/10,000" precision, which means the number you enter is the number you get. If you’re not confident in your measurements yet, the measurement tutorial on the site covers the tape method with additional examples, and the custom sizing guide walks through the door-size formula step by step.

Before using the configurator, have the following ready: all opening dimensions (width and height per cabinet), your overlay measurement, your hinge type or a photo of the existing hinge, and a decision on whether you want hinge holes pre-drilled. Sample doors are available if you want to confirm a finish or color before committing to a full order, which is worth doing when you’re choosing between similar shades or finishes across 20 or more doors. Tdm-thedoormaker ships across Canada, so lead time and delivery expectations are part of the checkout process.


What overlay should most Canadian DIYers choose first?

For a typical Canadian kitchen refacing project, partial overlay (1/2") is the most forgiving starting point. It works with the widest range of existing face-frame widths, pairs with the most commonly available concealed hinges, and leaves enough room for minor installation adjustments without the door looking misaligned. Full overlay is a worthwhile upgrade if your face frame is wide enough to support it and you want a more modern result, but it demands more precise hinge selection and leaves less margin for error during installation.

The practical recommendation: measure your existing overlay first. If your current doors use 1/2" partial overlay, stay there unless you have a specific aesthetic reason to change. If you’re converting from lipped to overlay, 1/2" partial overlay is the easiest transition. Reserve full overlay for projects where you’ve confirmed the face-frame width, chosen the correct concealed hinge, and are comfortable with the tighter installation tolerances.

When to call a professional instead of doing it yourself: frameless cabinet systems with structural modifications, any project that requires shimming or releveling the cabinet boxes, and installations where the existing boxes are out of square by more than 1/4". Those situations go beyond overlay selection and into carpentry work that affects the entire installation.


Ready to order doors sized to your exact overlay?

Knowing your overlay number is the step that separates a smooth custom-door order from a frustrating return. Tdm-thedoormaker’s configurator lets you enter your exact measurements, choose from over 30 door styles and 130+ colors and finishes, and add hinge holes to spec, all without leaving your home. The price is typically well below what a local cabinet shop charges for the same custom work, and the precision cut to 1/10,000" means what you measure is what arrives.

Tdm-thedoormaker

Before you start your order, confirm you have: every opening’s width and height measured to the nearest 1/16", your overlay number from the tape method, your hinge type (or a photo of the existing hinge), and a note on whether you need pre-drilled hinge holes. If you want to verify a finish before ordering a full set, request a sample door first. When you’re ready, order your custom cabinet doors online through the configurator and get an exact quote at checkout.


Sources

FROM THE SAME CATEGORY

Sep 8 2026 BY Ksenija Lebec, Blog

Landlords: inspect cabinets, run vacancy based ROI, budget $1,000–$13,000, and plan 1–3 day refacing installs with bulk order tips.

Build a Door MADE TO FIT YOU!